
Free shed plans with materials lists
How to build a shed: free 3D plans in 49 sizes
Step-by-step 3D plans with a complete materials list. 49 sizes in gable, lean-to and hip roof. Try any plan free, then get the full PDF for $19.99.
- $19.99 per plan
- 30-day money-back guarantee
- Instant PDF download


Pick your roof
Every plan comes with the same detail. Start with the look you want.


Popular plans
The sizes people build most.
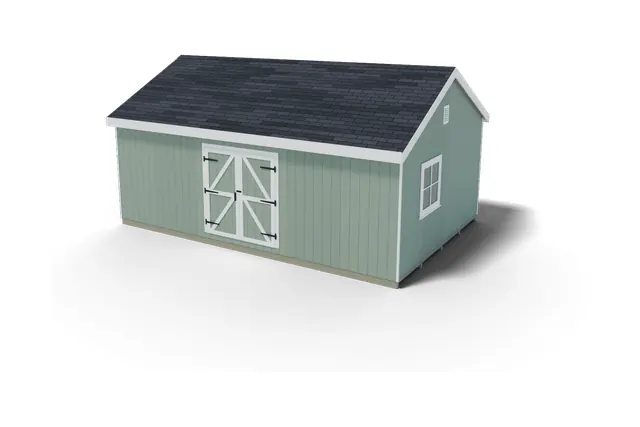
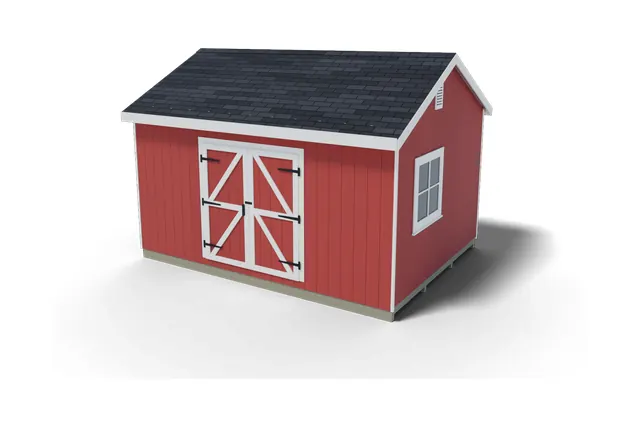
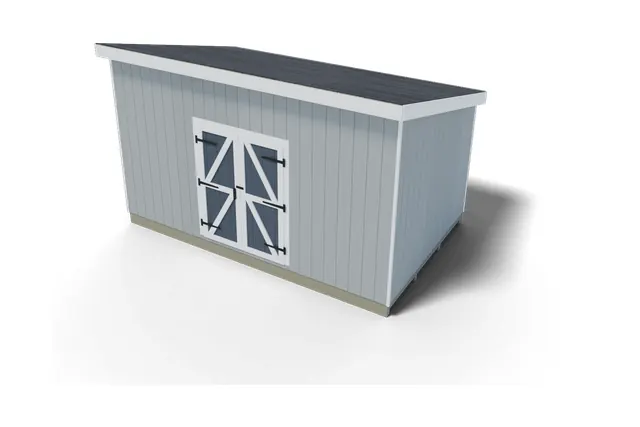
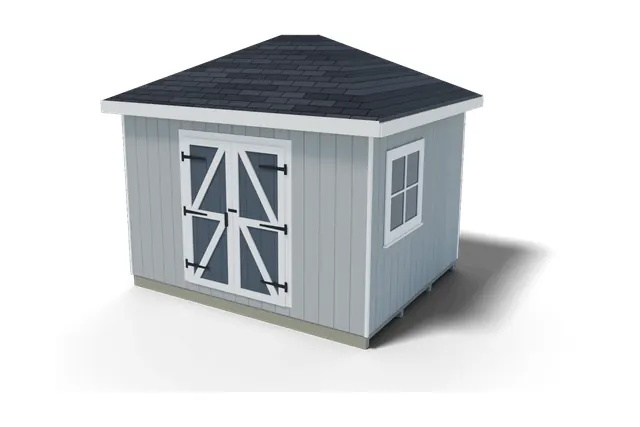
What is in every plan
Drawn in 3D and checked step by step, so you always know what goes where.
40+ illustrated steps
Foundation to roof, each step drawn in 3D with dimensions.
Complete materials list
Every board, sheet and fastener with quantities. Take it to the lumber yard.
Cuts and angles
Rafter angles, layouts and cut lengths worked out for you.
Print or use on a phone
One PDF by email right after checkout. Reads well on site.


How it works
- 1
Pick a size
49 plans from 4x8 to 16x24. Check your space and your town's size rules.
- 2
Try the free preview
Every plan has a free PDF preview, so you can see the layout before you buy.
- 3
Buy and build
$19.99, PDF by email straight after checkout. Not right for you? Full refund within 30 days.
Free guide
How to build a shed in 10 steps
From checking the rules to the finishing trim, shown on our 10×16 gable plan.
Steps
In this official guide “How To Build A Shed in A Week or Less” we’re going to cover the main & most important building steps of one of our premium shed plans. We’ll use our 10X16 Gable Storage Shed Plan as an example (keep that in mind). Although the below isn’t a complete guide – it covers the basics, the missing elements & much more are available as part of our premium plans. This free shed building guide will help YOU familiarize with the shed building process in general. It will also provide important information about shed building steps, preparation, objectives & materials needed. So, let’s dive right into it…
Shed requirements
Firstly, you should check with your state or local authority as to whether erecting a shed is permitted on the land you have chosen. Some states might require you to apply for permission, if your shed will exceed a certain size. Once you have established this, you can decide on a shed size and design. There several different types of shed to choose from, such as lean-to sheds that are 6X10 (small) and hip sheds that are 16X24 (large).
Gable sheds are ideal for yard storage. Lean-to sheds are great for storage too, with the benefit of sitting flush against a wall. Hip roof sheds are the most stylish type of shed. They stand out with their ‘hip roof’, which has sharp edges running to the eaves. Whichever sheds you’re interested in, our plans will help you build them in a week or less!

Let’s Go Shopping For Materials!
All of our plans also come with a comprehensive step by step shed building guide. This is in addition to the full materials & shopping list. The shed summary is a specification sheet, which details the shed’s dimensions, roof shape, sidewall height, number of doors, door opening dimensions, flooring options and recommended roofing material. In other words, it includes everything you need to build your dream shed from scratch. As an example, here is a break-down of materials needed for the 10X16 Gable Storage Shed:
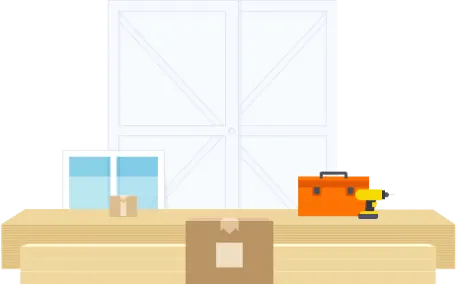
Foundation
Pressure-Treated 2×6 (Band) x2 Pressure-Treated 2×6 (Joist) x11 Pressure-Treated 4×4 (Skid) x3 ¾” Tongue and Groove Plywood (Floor Decking) x5
Hardware
Roofing Felt 2” Galvanized Finishing Nails 11/4” Galvanized Finishing Nails 3 ½” Galvanized Nails 6 inch bolts + few more specific items, that are available in premium plans.
Left and right wall
2×4 Plate x6 2×4 Wall Stud x25 2z4 Cripple Stud x10 2×4 Header x4 4x Trimmer Studs 8x Headers 4x Half inch filler blocks 5/8” T1-11 Exterior Siding x8
Front/Back Wall
2×4 Wall Stud x14 2×4 Plate x6 2×4 Cripple Stud x8 2×4 Trimmer Stud x2 2x Headers 1x Half inch filler block
Door
7x 8 feet trims (1×4) 1x 4 feet trims (1×4) 1x 3 feet trim (1×4) 6x door hinges 1x Door Handle and One Door Lock 1 lbs 1.25″ galvanized nails
Roof
2×4 Rafters x20 2×6 Overhang x6 7/16 OSB Roof Sheathing x6 5/8” T1-11 Exterior Siding x3
Trim
1×6 Lumbar x8 1/2” Plywood Soffit x4
Building the foundation
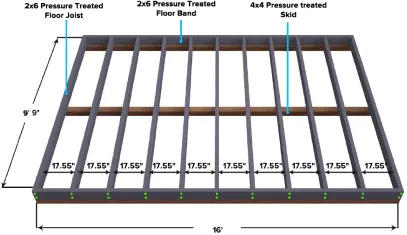
Building any shed starts with the foundation. The foundation is the base of your shed, so it must be strong and sturdy. It will be made from pressure-treated timber, with ¾” tongue and groove plywood being used for the floor decking.
1. Collect all your foundation materials together, including all timber and hardware.
2. Build your foundation at the spot where your shed will be erected. This will save you from moving it later.
3. Clear the area where the foundation will be built of any vegetation. Ensure that the chosen spot is flat, so that the shed has even ground to stand on.
4. Start by building the foundation frame (exterior frame). This will serve as an outline.
5. Cut your timber to make bands and joists to the specifications outlined in your shed plan. Nail them into place so that they fit plumb.
6. Place your skids below the frame – these will support the flooring from weight.
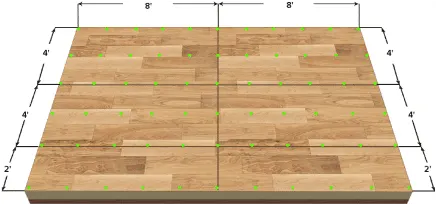
7. With the foundation frame built, it is time to lay down the flooring. Take and cut your tongue and groove plywood, and nail it onto the frame using galvanized nails.
Building the front and back wall
With the foundation built, you will build the front and back wall. On the 10X16 Gable Shed, the front wall houses a garage door.
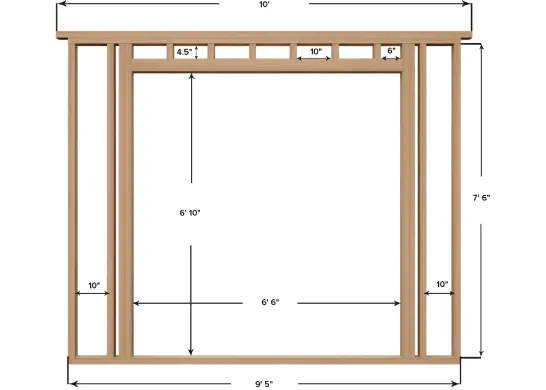
1. Start by building the front wall. The front wall has a cut-out for the garage door. Build the front wall’s frame first.
2. With the frame built, work you’re your inwards with the studs. There should be a 9” gap between the outer frame and two inward studs.
3. Leave a cut-out for the garage door. You can either make a door yourself on a hinge, or you can install a pre-made roller garage door.
4. With the front wall frame built, nail your T1-11 siding to it.
5. Start building the back wall. The back wall is simpler to construct, since it does not have a cut-out for a window or a door. Finish it off with T1-11 siding.
You can use any pre-made roll-up garage door so long as it fits the opening. Motorised garage doors are too heavy for the structure, however, so avoid these. If you want to make your own garage door, it’s easiest to create a hinged door. These are essentially large double doors that open outwards, rather than inwards.
Building and erecting the side walls
Building the side walls is relatively simple, although one wall will house a window. You can choose which wall houses the window to suit its location.
1. Start by gathering your lumber and building materials.
2. Build the wall by starting with the frame first. With the frame built, you can work your way inwards with the cripple and wall studs.
3. Cut your lumber to the specifications outlined in your shed plan. Take care when measuring the lumber, to ensure a good cut-out for the window.
4. With the wall frames built, nail the T1-11 siding to them using finishing nails. With the siding affixed, you can now move onto erecting the walls.
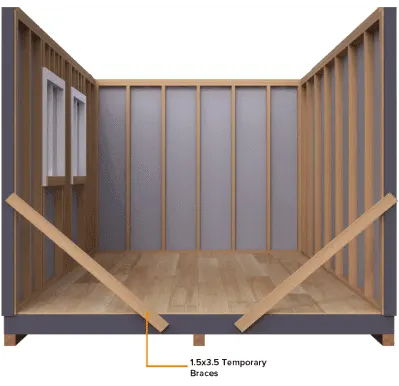
5. Erect the walls. Affix them to the foundation using temporary supports, and remove the supports after you have fixed the walls to the foundation.
6. We recommend erecting the walls with the help of a friend. The walls will be relatively heavy and cumbersome to handle by yourself.
Building the roof
Construction of the roof is the most time-consuming part of a shed build, because you will need to make several rafters to the same specification. Hip roofs take the longest time to build, while basic and gable shed roofs take a little less time to build.
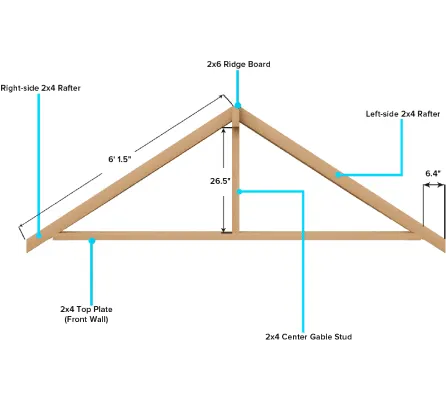
1. Start by building the rafters. The rafters on the 10X16 Gable Shed measure 5’ 8.5”. 20 rafters will be needed in total.
2. With the rafters made, start installing the gussets on both sides. Each rafter will have gussets on one side. With the gussets installed, nail your rafters down onto the top plate of the walls one-by-one, until the roof ‘skeleton’ is complete.
3. With the rafters made, start installing the gussets on both sides. Each rafter will have gussets on one side. With the gussets installed, nail your rafters down onto the top plate of the walls one-by-one, until the roof ‘skeleton’ is complete.
Adding shingles to the roof
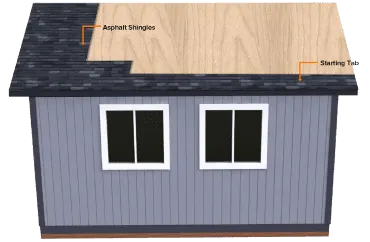
With your OSB sheathing and felt installed, you can start layering the shingles. You will use asphalt shingles for the roof in this shed plan – although you can use any shingle you like, so if you prefer stone shingles, then you can use these.
Follow the manufacturer’s instructions and layer the shingles as outlined. It is important to follow the manufacturer’s recommended pattern for best performance. If your shingles did not come with instructions, you should be able to find some online.
The shingles you will use for this shed are made from asphalt. Asphalt is an exceptionally durable roofing material. These shingles have a shelf-life in excess of 15 years and can be easily replaced if damaged. They are also easy to install. If you would rather use something different that’s absolutely fine. The OSB sheathing is compatible with most shingles.
Installing the trims
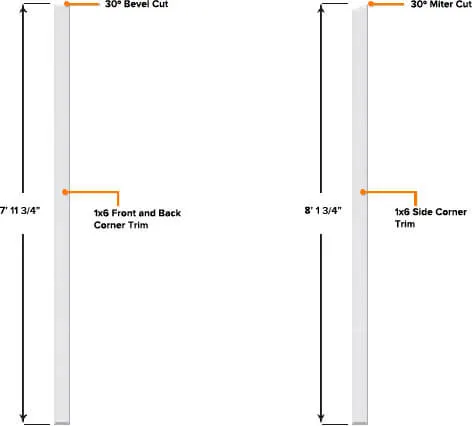
With the roof built and shingles laid, it’s time to install the trims. These add a professional touch to the roof and protect from water ingress. The trims are two separate pieces, installed for the front and back. The 1×6 corner trim for the front measure 7’ 11 ¾” with a 30-degree bevel cut. The 1×6 side corner trim measures 8’ 13/4” and has a 30-degree milter cut on the top. They should sit flush with the shed roof.
Installing fascia boards and soffits
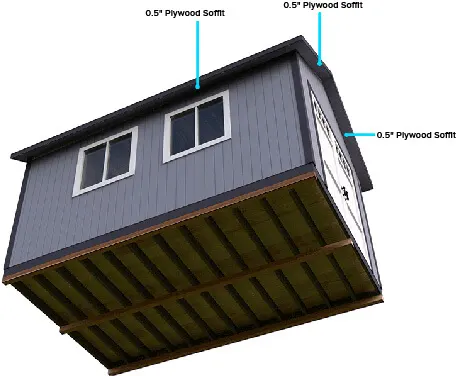
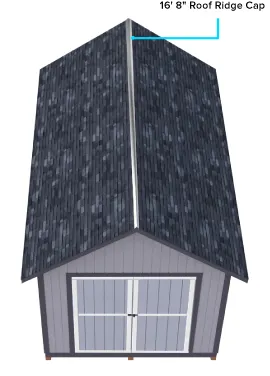
With your roof trims installed, next we’ll move onto installing the fascia boards and eve soffits. The fascia boards are for the left and right sides of the shed. Measure and cut two 1×6 trims into 16’ 8”. These are your fascia boards. Install the boards by nailing them onto the roof edges using 2” galvanized nails.
Once you have installed the fascia boards, you can move onto installing the soffits. The soffits will be installed on the shed eves. Measure and cut two 16’ 9” x 6 2/5” plywood soffits using lumber described in your materials list. These will be your soffits for the shed sides. Measure and cut four 5’ 7 4/5” plywood soffits for the shed front and rear. Nail them into the rafters using 2” galvanized nails.
Finishing touches
With your soffits installed, your shed is complete. It will now be structurally sound, although rather naked in appearance. We recommend treating the exterior of your shed to a coating of paint or wood stain. This will help your shed blend into its environment (or stand out if you prefer). It will also help protect the timber from weathering. If you’d rather your shed age naturally, you might like to sand the timber to even its surface.
If you have plans to use the shed as a comfortable work area, you could even use plasterboard to make proper internal walls. Electrical cables can safely be fed through the shed so long as they are properly insulated and fire-rated. Most importantly of all, remember to enjoy your shed. It’s all yours, and it was proudly built with your own hands.
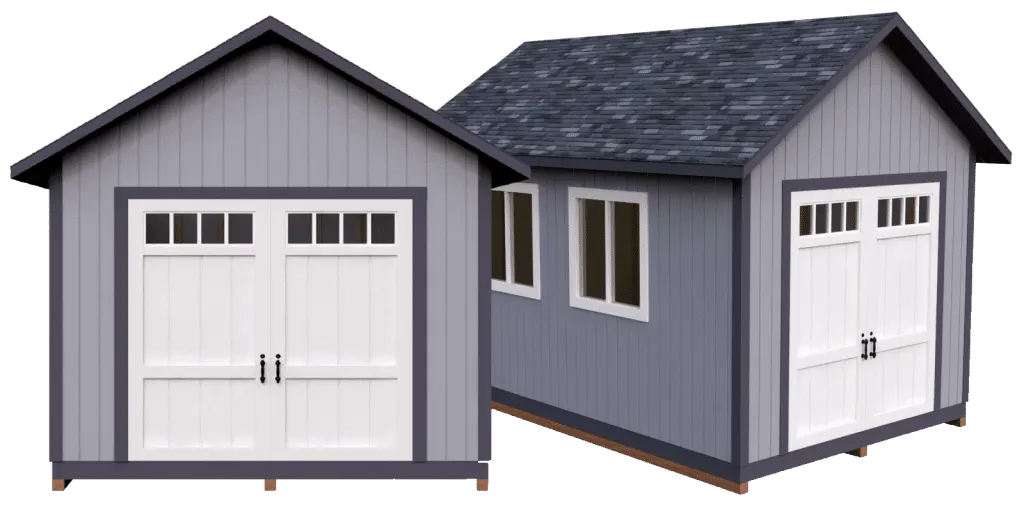
How to build a shed starts with a plan: 3DSHEDPLANS has 48 free shed plans, 4x8 to 16x24. Each free preview PDF shows basic drawings, measurements and steps, but no materials list. Free materials lists are posted for the 8x10, 8x12, 10x12, 10x16, 12x12 and 12x16. The $19.99 full plan adds the shopping list, cut list and all measurements.
Free shed plans by size
Pick your size and roof below. The free preview opens as a PDF; the plan page shows what the full plan includes and its price. Floor area uses the nominal outside size.
Gable roof shed plans
Lean-to shed plans
| Size | Floor area | Free preview | Full plan with material list |
|---|---|---|---|
| 4x8 | 32 sq ft | Free 4x8 PDF | 4x8 lean-to plan |
| 4x10 | 40 sq ft | Free 4x10 PDF | 4x10 lean-to plan |
| 4x12 | 48 sq ft | Free 4x12 PDF | 4x12 lean-to plan |
| 6x6 | 36 sq ft | Free 6x6 PDF | 6x6 lean-to plan |
| 6x10 | 60 sq ft | Free 6x10 PDF | 6x10 lean-to plan |
| 8x16 | 128 sq ft | Free 8x16 PDF | 8x16 lean-to plan |
| 12x14 | 168 sq ft | Free 12x14 PDF | 12x14 lean-to plan |
| 12x18 | 216 sq ft | Free 12x18 PDF | 12x18 lean-to plan |
| 12x24 | 288 sq ft | Free 12x24 PDF | 12x24 lean-to plan |
| 14x14 | 196 sq ft | Free 14x14 PDF | 14x14 lean-to plan |
| 14x16 | 224 sq ft | Free 14x16 PDF | 14x16 lean-to plan |
| 14x20 | 280 sq ft | Free 14x20 PDF | 14x20 lean-to plan |
Hip roof shed plans
| Size | Floor area | Free preview | Full plan with material list |
|---|---|---|---|
| 8x16 | 128 sq ft | Free 8x16 PDF | 8x16 hip roof plan |
| 10x12 | 120 sq ft | Free 10x12 PDF | 10x12 hip roof plan |
| 10x16 | 160 sq ft | Free 10x16 PDF | 10x16 hip roof plan |
| 12x20 | 240 sq ft | Free 12x20 PDF | 12x20 hip roof plan |
| 16x20 | 320 sq ft | Free 16x20 PDF | 16x20 hip roof plan |
| 16x24 | 384 sq ft | Free 16x24 PDF | 16x24 hip roof plan |
Not sure which roof? Compare them in gable vs lean-to vs hip roof sheds, or browse the gable, lean-to and hip roof plan pages.
Free shed materials lists
The free previews do not include a materials list. For six popular sizes, we publish the lumber, sheet goods and hardware list for free:
- 8x10 shed material list
- 8x12 shed material list
- 10x12 shed material list
- 10x16 shed material list
- 12x12 shed material list
- 12x16 shed material list
Another size or roof? The free shed material calculator lists the lumber, sheets, shingles and hardware for 87 sizes of gable, lean-to and hip roof sheds. New to material lists? This worked 10x12 example shows how a list is built and how much extra to buy.
Free preview vs full plan
| Item | Free preview PDF | Full plan PDF ($19.99) |
|---|---|---|
| Drawings | Basic schematics | 3D views from every angle |
| Measurements | Basic measurements | Every part |
| Instructions | Simplified steps | Step by step, each stage drawn |
| Material list | No | Full shopping list |
| Cut list | No | Yes |
| Pro tips | No | Yes |
| Delivery | Instant download | Emailed right after purchase |
Before you trust any free plan, run the 8 checks in our free shed plans PDF guide.
How to build a shed: where to start
- Check the rules first. Size and height limits vary by town, so check your local permit office. Our shed permit checklist lists what to ask.
- Price it. See how much it costs to build a shed by size, and whether it is cheaper to build or buy.
- Pick a foundation. Gravel, blocks, piers or a slab: compare them in shed foundation options.
- Choose a plan and build. Print the free preview first and stake the footprint in your yard; a 10x12 often feels bigger on paper than on the lawn. Then follow the full plan's steps. For a simple first build, read how to build a lean-to shed.
See every size on one page with door widths and heights in all shed plans.
Frequently asked questions
Are the free shed plans really free?
Yes. Every free preview PDF downloads with one click, with no sign-up and no payment. It shows the basic drawings, measurements and building order for that size.
Do the free shed plans include a materials list?
No. The free previews leave out the materials list and cut list. Free materials lists for the 8x10, 8x12, 10x12, 10x16, 12x12 and 12x16 sizes are on this site, and every $19.99 plan has a full shopping and cutting list.
What does the $19.99 plan add to the free preview?
Views from all angles, measurements for every part, a full layout for every step, step-by-step instructions, a full material and shopping list, a cut list and pro tips. The PDF is emailed after purchase.
Which free shed plan should I start with?
Start with the size that fits your yard and what you store. A 10x12 is a common all-purpose size; a lean-to has the simplest roof framing.
Do I need a permit to build a shed?
It depends on your town, the shed size and its height. Check your local permit office before you buy lumber.
Shed building guides
All guides 16×16 Shed Material List: Lumber, Sheets and Hardware
 How to Insulate a Shed: Walls, Roof and Floor
 10×18 Shed Material List: Lumber, Sheets and Hardware
 How to Build a Firewood Shed: 8 Steps and Lumber List
 8×14 Shed Material List: Lumber, Sheets and Hardware
 What Size Shed Is 120 Square Feet? 10×12 and Other Sizes