
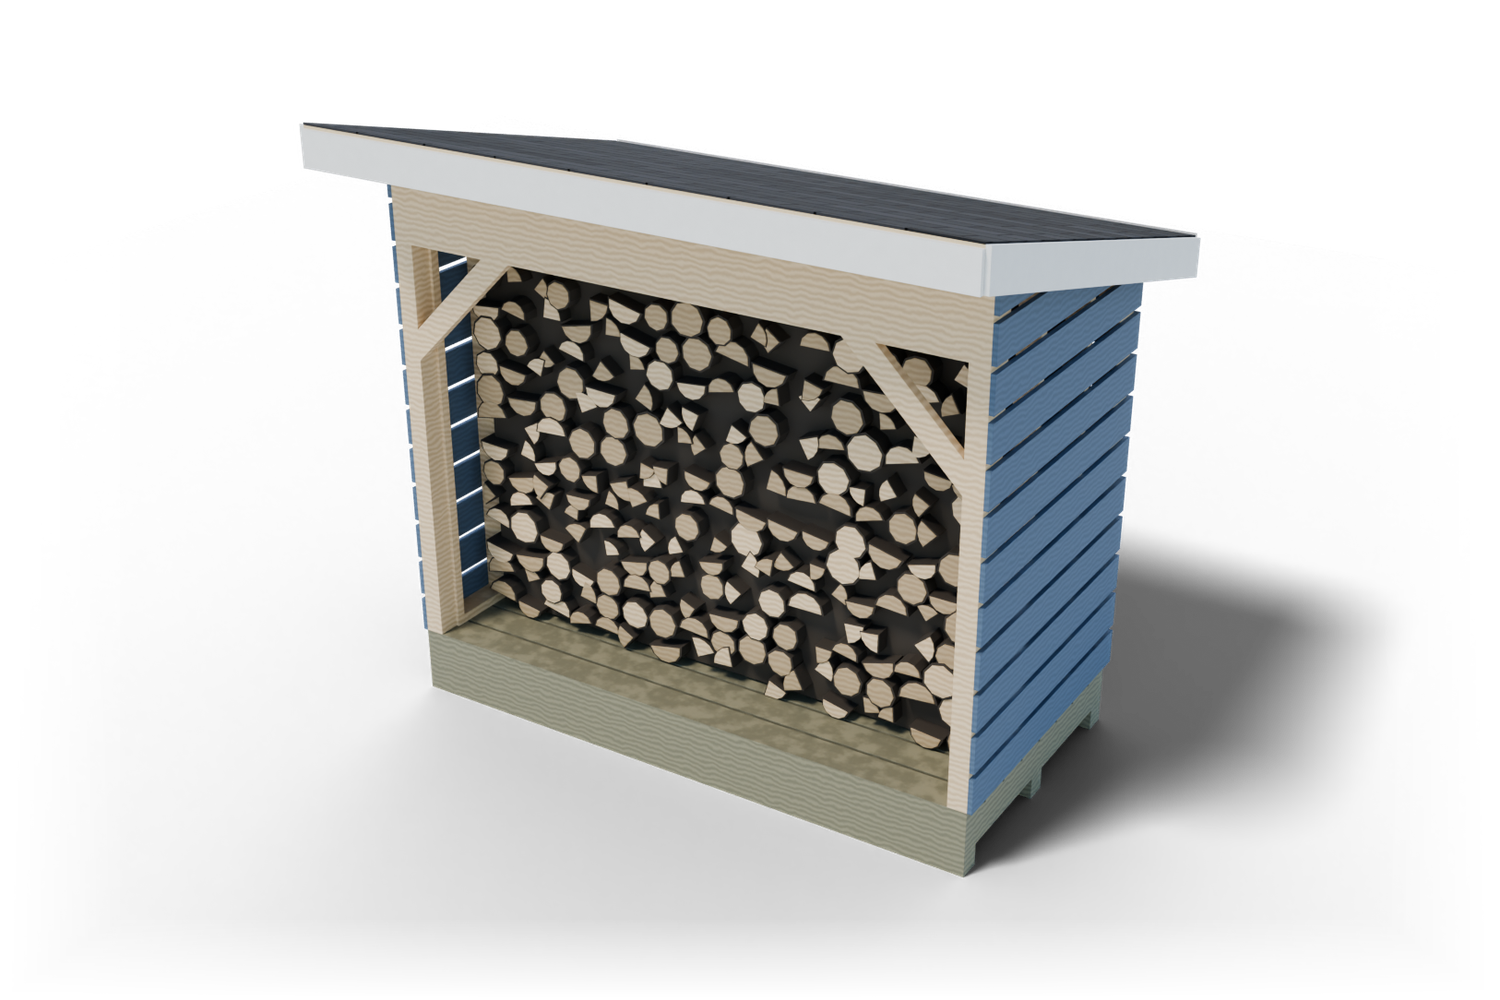
Open-front woodshed · 32 sq ft
4x8 Firewood Shed Plan
Build this 4x8 firewood shed yourself. Every board, cut and step, drawn in 3D across 39 pages.
- 30-day money-back guarantee
- PDF by email right after checkout
- Visa, Mastercard, Amex, PayPal
- Full material and shopping list
- Cut list with every length
- Step-by-step 3D views, 39 pages
- Phone, tablet, PC and Mac

The 3DSHEDPLANS™ 4x8 firewood shed plan is a 39-page PDF for an open-front woodshed 8 ft wide and 4 ft deep. It holds about 0.79 cord of 16 in split logs (124 cu ft of stack space) under a 3/12 lean-to roof, with slatted walls, a gapped floor, a shopping list, a cut list and 18 step-by-step sections.
Get the full plan PDF for $14.99 or download the free preview
What builders say
A year ago I had only built flat-pack furniture. The plans are simple to follow, and you don't need years of experience.
The illustrations are fantastic, and the shopping list helped me buy the right materials. It took me five days to build my shed.
Pre-built sheds were hundreds of dollars. The plan laid everything out perfectly, and I saved hundreds in the process.
4×8 firewood shed plans: what you get
These 4×8 firewood shed plans are for an open-front woodshed with an 8 ft wide front, 4 ft of depth and room for about 0.79 cord of 16 in split firewood. The PDF has 39 pages: a shopping list with quantities, a cut list with every length, and 18 step-by-step sections with 3D drawings, from the gravel pad to the last wall slat.
The shed stands on 3 pressure-treated 4×4 skids. Its floor is pressure-treated 2×6 boards laid flat with 9/16″ gaps, the back and side walls are 1×6 slats with 1 in gaps, and the front is one open bay 7′ 6″ wide. The 3/12 lean-to roof slopes from a 6′ 5 1/8″ front wall to a 5′ 6″ back wall and overhangs 1′ 0″ front and back, so rain stays off the stack while air moves through it.
Every part in the lists is drawn on its step page, and the shopping list, the cut list and the drawings were checked against each other part for part before the plan went on sale. The 4×8 firewood shed plan sells for $14.99 as an instant PDF download that works on a phone, a tablet or a printed copy.
How much firewood does the 4×8 firewood shed hold?
The stack space inside the walls is 7′ 5″ wide, 3′ 3 1/2″ deep and 5′ 1″ high. Filled to every inch that is 124 cu ft, or 0.97 of a full cord. A full cord is 128 cu ft of tightly stacked wood, a stack 4 ft high, 4 ft deep and 8 ft long.
What you really stack depends on your log length, because only whole rows fit from the back wall to the front posts. With 16 in logs the shed takes 2 rows front to back, about 0.79 cord or 2.4 face cords. The best fit is 12 or 18 in logs at 0.88 cord. A face cord (also called a rick) is one row of logs 4 ft high and 8 ft long, so its volume changes with the log length.
| Log length | Rows front to back | Wood stacked | Full cords | Face cords |
|---|---|---|---|---|
| 12 in | 3 | 113 cu ft | 0.88 | 3.5 |
| 16 in | 2 | 101 cu ft | 0.79 | 2.4 |
| 18 in | 2 | 113 cu ft | 0.88 | 2.4 |
| 24 in | 1 | 75 cu ft | 0.59 | 1.2 |
Loose or crooked wood takes more room than a tight stack, so treat these numbers as the most the shed holds. Whatever depth your log length leaves in front of the last row is working room for an armful of kindling.
4×8 firewood shed specs
Every number below is printed in the plan’s Specs table. Lengths are in feet and inches, and lumber sizes are nominal: a 2×4 is really 1 1/2 in by 3 1/2 in.
| Spec | Value |
|---|---|
| Footprint | 8′ 0″ wide x 4′ 0″ deep (32 sq ft) |
| Capacity | about 0.79 cord of 16 in logs, 2.4 face cords (124 cu ft of stack space) |
| Stack space inside | 7′ 5″ wide x 3′ 3 1/2″ deep x 5′ 1″ high |
| Open front | 1 bay 7′ 6″ wide x 5′ 4 7/8″ clear high |
| Wall heights | front (high) 6′ 5 1/8″, back (low) 5′ 6″ |
| Floor height | 10 1/2″ from grade to the top of the deck |
| Overall height | about 7′ 11″ above grade |
| Roof | lean-to 3/12 (14.0 deg), 1′ 0″ overhangs front and back, 4″ rakes |
| Rafters | 7 2×4 at 16 in on center plus 2 fly rafters |
| Foundation | 3 pressure-treated 4×4 skids on a compacted gravel pad |
| Floor | pressure-treated 2×6 joists 16 in on center, 8 rows of 2×6 decking with 9/16″ gaps |
| Walls | 2×4 studs 16 in on center; back and sides covered with pressure-treated 1×6 slats, 1 in gaps |
| Roof covering | 7/16 in OSB, two layers of 15 lb felt, drip edge, 3-tab asphalt shingles |
| The PDF | 39 pages, 18 step-by-step sections |
Why an open front, slatted walls and a gapped floor?
Firewood dries when air moves across it and stays wet when rain or ground moisture reaches it. A closed storage shed keeps the rain off but traps damp air, so wood can mold in it. This shed is built the other way around: open where air can move, covered where water falls.
- Open front. The front wall is one open bay under a doubled 2×10 header, so you load and take wood from the front and the wind can reach the stack. Knee braces 2′ 1 7/16″ long, cut at 45 degrees on both ends, stiffen the posts against racking.
- Slatted back and sides. 10 rows of 1×6 slats on the back wall and 12 on the sides, each with a 1 in gap, keep the stack in and let air through. A spacer block ripped from a 2×4 offcut sets every gap the same.
- Gapped floor off the ground. The deck sits 10 1/2″ above grade on skids, and its boards have 9/16″ gaps. Air comes up through the bottom of the stack and bark and dirt fall through instead of holding water against the wood.
- Deep overhangs. The roof reaches 1′ 0″ past the front and back walls, which keeps blowing rain off the face of the stack and drips clear of the slats.
Every part that touches the ground or holds the wood (skids, floor, slats and bottom plates) is pressure-treated. The rest of the frame is sealed with an exterior water sealer or stain before the slats go on.
Materials list for the 4×8 firewood shed
This is the plan’s shopping list, item by item. Lumber is listed in the stock length that wastes the least for its parts, and every quantity is what you carry home, not a guess with extra added. The PDF also says what each board is used for and has the cutting plan that turns these boards into parts.
| Section | Item | Qty |
|---|---|---|
| Foundation and floor | Pressure-treated 2×6 x 8 ft | 14 |
| Foundation and floor | Pressure-treated 4×4 x 8 ft | 3 |
| Front wall | 2×10 x 8 ft | 2 |
| Front wall | 2×4 x 12 ft | 1 |
| Front wall | 2×4 x 14 ft | 1 |
| Front wall | 2×4 x 8 ft (full 96 in boards, not 92 5/8 in precut studs) | 2 |
| Front wall | Pressure-treated 2×4 x 8 ft (full 96 in boards, not 92 5/8 in precut studs) | 1 |
| Back wall | 2×4 x 16 ft | 3 |
| Back wall | 2×4 x 8 ft (full 96 in boards, not 92 5/8 in precut studs) | 2 |
| Back wall | Pressure-treated 1×6 x 8 ft | 10 |
| Back wall | Pressure-treated 2×4 x 8 ft (full 96 in boards, not 92 5/8 in precut studs) | 1 |
| Left wall | 2×4 x 8 ft | 5 |
| Left wall | Pressure-treated 2×4 x 8 ft | 1 |
| Right wall | 2×4 x 8 ft | 5 |
| Wall slats and braces | 2×4 x 8 ft | 1 |
| Wall slats and braces | Pressure-treated 1×6 x 10 ft | 1 |
| Wall slats and braces | Pressure-treated 1×6 x 14 ft | 7 |
| Wall slats and braces | Side wall slat (1×6, 1 in gaps, back end cut to the roof slope): PT 1×6, 2 @ 1′ 10 1/2″ | – |
| Roof framing | 2×4 x 14 ft | 5 |
| Roof framing | Lookout block (rake overhang): 2×4, 8 @ 2 1/2″ | – |
| Roof framing | Blocking between rafters (over each wall): 2×4, 4 @ 1′ 1 3/4″ | – |
| Roof framing | Blocking between rafters (over each wall): 2×4, 8 @ 1′ 2 1/2″ | – |
| Roof covering | Roof sheathing: sheet 4 by 8 ft 7/16 OSB | 3 |
| Roof covering | Roofing felt (double layer below 4/12): roll 15 lb (400 sq ft; this roof uses about 120 sq ft with the laps, keep the rest dry for repairs) | 1 |
| Roof covering | Asphalt shingles: bundle 3-tab, 26 shingles, incl. starter | 2 |
| Roof covering | Drip edge: 10 ft piece | 4 |
| Fascia | 1×6 x 10 ft | 2 |
| Fascia | 1×6 x 14 ft | 1 |
| Hardware | Framing nails 3 1/2 in (16d) hot-dip galvanized: lb | 11 |
| Hardware | Structural wood screws 3 in, exterior (king studs to deck and rim, 2 each, 2 spare): each | 6 |
| Hardware | Deck screws 3 in exterior (decking boards, 2 per joist): lb | 4 |
| Hardware | Siding nails 2 in (6d) hot-dip galvanized (slats, 2 per stud): lb | 4 |
| Hardware | Sheathing nails 2 1/2 in (8d) for OSB: lb | 2 |
| Hardware | Roofing nails 1 1/4 in galvanized: lb | 2 |
| Hardware | Roofing cap nails 1 in (felt): lb | 1 |
| Hardware | Hurricane ties (rafter to plate), H2.5A type or equal, 10 nails each: each | 10 |
| Hardware | Strap ties (twist straps) for the wall corners: each | 4 |
| Hardware | Connector nails 1 1/2 in (hurricane ties and straps): lb | 2 |
| Hardware | Crushed stone 3/4 in for the pad (loose, before tamping): cu yd | 0.9 |
| Hardware | Pressure-treated 4×6 x 12 ft, ground contact (UC4A or higher), for the gravel pad frame: each | 2 |
| Hardware | Pressure-treated 4×6 x 16 ft, ground contact (UC4A or higher), for the gravel pad frame: each | 1 |
| Hardware | Rebar stakes 1/2 in (#4) x 24 in, for the pad frame: each | 14 |
| Hardware | Galvanized timber spikes 3/8 in x 10 in for the pad frame corners (2 per corner): each | 8 |
| Hardware | Galvanized nails 2 1/2 in (8d) for the fascia: lb | 1 |
| Hardware | Exterior water sealer or stain (untreated framing at once, PT parts once dry): gallon | 2 |
| Hardware | Roofing cement, 10 oz tubes: each | 1 |
| Hardware | 1 in spacer blocks for the slats (rip from a 2×4 offcut): each | 2 |
| Hardware | Temporary braces 2×4 x 8 ft: each | 9 |
| Hardware | 2×4 x 8 ft for 8 stakes 24 in, pointed (ground braces, and 2 that prop the back-wall braces): each | 2 |
| Hardware | Earth anchors with straps (optional, windy sites: one per corner, strap over the outer skid, 2 structural screws): each | 4 |
| Hardware | Structural wood screws 5 in, exterior (bottom plates to rim every 16 in; knee braces 2 per end): each | 24 |
| Hardware | Ice and water barrier, 36 in wide (cold areas: one strip along the low eave): ft | 10 |
The plan does not list prices because lumber costs change every week. Take the list to the pro desk of your lumber yard or home center for a quote; they can pull it in one order.
The main parts and their lengths
The full cut list in the PDF gives every part of the 4×8 firewood shed, its lumber and its exact length, including the stepped side wall studs, the slats cut to the roof line and the blocking. These are the main framing parts:
| Part | Lumber | Length | Qty |
|---|---|---|---|
| Skid | PT 4×4 | 8′ 0″ | 3 |
| Rim joist | PT 2×6 | 8′ 0″ | 2 |
| Floor joist | PT 2×6 | 3′ 9″ | 7 |
| Floor decking board | PT 2×6 | 8′ 0″ | 8 |
| Front wall stud | 2×4 | 6′ 0 5/8″ | 2 |
| Front header | 2×10 | 7′ 9″ | 2 |
| Back wall stud | 2×4 | 5′ 1 1/2″ | 9 |
| Rafter | 2×4 | 6′ 3 1/16″ | 7 |
| Fly rafter | 2×4 | 6′ 3 1/16″ | 2 |
| Knee brace | 2×4 | 2′ 1 7/16″ | 2 |
| Back wall slat | PT 1×6 | 8′ 0″ | 10 |
| Side wall slat | PT 1×6 | 4′ 0 3/4″ | 20 |
Cut and label the parts one section at a time. The cutting plan shows which board each part comes from, so the offcuts are big enough for the blocking, the lookout blocks and the slat spacer blocks.
Tools you need
Nothing on this list is a specialty tool. The plan is written so one person can build the shed: no wall is carried, the front wall is built in place piece by piece, and the back wall is tipped up against a stop block nailed to the rim.
- Circular saw, speed square and framing square for every cut, the 45 degree knee brace ends and the roof angle
- Handsaw, wood chisel and flat pry bar to cut the bottom plate out of the open bay
- Drill/driver with bits for the deck screws and pilot holes near board ends
- Framing hammer, or a framing nailer and compressor
- 4 ft level, an 8 ft straight board and a string line for the skids, walls and rafters
- 25 ft tape, chalk line and a carpenter’s pencil
- Step ladder, two sawhorses and two clamps
- Utility knife, caulk gun and tin snips for the felt, shingles and drip edge
- Shovel, rake and hand tamper for the gravel pad
- Safety glasses, hearing protection and gloves
Plan on about 382 framing nails (3 1/2 in, hot-dip galvanized) and 408 slat nails. Use galvanized or coated exterior fasteners everywhere: pressure-treated lumber corrodes plain steel.
How to build the 4×8 firewood shed, step by step
The PDF splits the build into 18 step-by-step sections, each with numbered steps, measured drawings and a 3D view with the new parts in orange. This is the order the plan follows:
Step 1: Lay out the site and the gravel pad
Mark the corners 8′ 0″ along the front and 4′ 0″ along the sides, then move one stake until both diagonals measure 8′ 11 5/16″. Strip the sod 12 in past the shed on every side and spread 4 in of 3/4 in crushed stone (about 0.9 cu yd), compacted in two layers and raked level.
Step 2: Set the skids
Lay 3 pressure-treated 4×4 skids, 8′ 0″ long, on the pad with the outer skids flush with the floor edges. Level each one along its length and to the others with a straight board, and raise a low skid with gravel or treated shims, never untreated wood.
Step 3: Build the floor frame
Cut two pressure-treated 2×6 rims at 8′ 0″ and 7 joists at 3′ 9″. Mark both rims at once, 16 in on center, nail three 3 1/2 in galvanized nails through the rim into each joist, and square the frame by its diagonals before you toe-nail it to the skids.
Step 4: Lay the gapped deck
Screw down 8 rows of pressure-treated 2×6 laid flat, with 9/16″ gaps, two 3 in deck screws into every joist. The plan gives the mark for the front edge of every row, so nothing is ripped and the last board ends flush with the back rim.
Step 5: Frame the back and side walls
Frame the 5′ 6″ back wall flat on the deck, tip it up against the stop block and brace it plumb. The side walls have a sloped top plate and stepped studs that follow the roof line; the plan gives each stud length.
Step 6: Build the open front
Build the 6′ 5 1/8″ front wall in place: king studs, trimmers and a doubled 2×10 header over the bay, then cut the bottom plate out of the opening. Screw in the 2′ 1 7/16″ knee braces with two 5 in structural screws at each end.
Step 7: Join the walls
Nail the corners every 12 in, add the strap ties and cut the bottom plate out of the open bay. No long diagonal braces: once the slats are on, they, the roof deck and the knee braces keep the shed square, the way small woodsheds are built. Until then a 2×4 tacked inside each slatted wall holds it.
Step 8: Set the rafters
Cut one pattern rafter, test it on both walls, then cut 7 2×4 rafters for 16 in on center, plus 2 fly rafters for the rakes. Each middle rafter gets a hurricane tie on both walls, the two end rafters are nailed down into the sloped side wall plates, and blocking goes between the rafters over the walls.
Step 9: Sheathe and shingle the roof
Nail 3 sheets of 7/16 in OSB (4 by 8 ft), add the fascia and drip edge, then two layers of 15 lb felt because the roof is below 4/12. Lay 2 bundles of 3-tab shingles with four nails per shingle below the sealant strip.
Step 10: Nail on the wall slats
Start at the bottom with the spacer blocks: 10 rows of 1×6 slats on the back wall and 12 on the sides, two 2 in galvanized nails per stud. The top rows taper to the roof line, and the plan draws each wall seen from outside.
Step 11: Seal and stack
Coat the untreated framing, rafter tails and fascia with exterior sealer or stain. The pressure-treated parts wait until they are dry, then get the same coat. Stack the first load tight and level, bark side up on top.
How long does it take to build?
The plan estimates about 30 hours for one person, about 2 full weekends for a first-timer. Staining waits until the pressure-treated wood dries, so it is not in these hours.
| Stage | Typical time for one person |
|---|---|
| Site and gravel pad | 5 h |
| Cutting, skids, floor | 5 h |
| Walls and braces | 7 h |
| Roof: rafters to shingles | 9 h |
| Slats (about 450 nails) | 4 h |
The skill level is basic framing: measuring, square cuts, nailing and checking level and plumb. The angled cuts are the 45 degree knee brace ends, the rafter plumb and seat cuts, and the sloped tops of the side wall studs and slats, and the plan gives every angle and every mark to copy.
Where to put a firewood shed
- Distance from the house. Many fire departments advise keeping stored firewood away from the house, and wood piles draw insects. Follow your local guidance and check your local permit office for setback rules.
- Drainage. Pick a spot where water does not stand after rain. The gravel pad is 10′ 0″ by 6′ 0″, 12 in larger than the shed on every side, so rain drains away from the skids.
- Wind and rain. Face the open front away from the wind that brings most of your rain if you can, and leave room in front to walk up with a wheelbarrow.
- Sun and air. A spot with sun and moving air dries wood faster than a corner behind a fence. Keep the back wall a hand’s width off any fence or wall so air can pass the slats.
- Wind on an empty shed. An open shed catches wind like a sail when it is empty. On windy sites the plan shows optional earth anchors, one per corner, strapped over the outer skids.
How to stack and season wood in the shed
Stack split wood tight and level, starting 1 1/2 in in front of the back wall’s studs so air moves behind the stack. Keep the front face plumb and never past the inside face of the front posts, so the knee braces stay clear, and keep the top about 2 in under the back wall’s top plates.
Put the bark side up on the top layer so rain runs off. Burn the oldest wood first: stack new wood on one side and take from the other. Most split hardwood needs 6 to 12 months under cover to season, and the open front, the slats and the gapped floor keep air moving through it the whole time.
Split wood dries faster than rounds, and wood cut in late winter or spring is usually ready to burn by the next fall. A cheap moisture meter tells you when a split face reads low enough for your stove.
What is in the free 4×8 firewood shed plan preview?
Download the free 4×8 firewood shed plan preview before you buy. It shows the shed from the front and the side with its overall size, the build stages in order and real pages from the plan, so you can see how the drawings look and whether the size fits your yard.
| Item | Free preview | Full plan |
|---|---|---|
| Overview, 3D views and build stages | Yes | Yes |
| Material list with quantities | No | Yes |
| Cut list for every part | No | Yes |
| Measurements in every step | Overall sizes | Every part |
| Step-by-step drawings | Preview pages | 39 pages, 18 sections |
| Capacity table by log length | No | Yes |
| Price | Free | $14.99 |
Not right for you? Email [email protected] within 30 days of your purchase for a full refund.
Before you build
Rules for sheds, such as size limits, setbacks and permits, vary by town and HOA, and some towns treat a roofed woodshed like any other shed. Check your local permit office before you build.
This plan uses common small-shed framing. Heavy snow areas or high-wind zones may need closer rafter spacing, larger rafters or anchors to the ground; your local permit office knows the loads for your address.
Every spring, check the roof for lifted shingles, tighten loose slats, sweep bark off the floor and make sure the skids are still level and the gravel drains. More firewood shed sizes and every lean-to plan are on the lean-to shed plans page, and every plan we sell is on all shed plans.
Shed building guides
- 16×16 Shed Material List: Lumber, Sheets and Hardware
- How to Insulate a Shed: Walls, Roof and Floor
- 10×18 Shed Material List: Lumber, Sheets and Hardware
- How to Build a Firewood Shed: 8 Steps and Lumber List
- 8×14 Shed Material List: Lumber, Sheets and Hardware
- What Size Shed Is 120 Square Feet? 10×12 and Other Sizes
Frequently asked questions
How much firewood does a 4×8 firewood shed hold?
The stack space is 7' 5" wide, 3' 3 1/2" deep and 5' 1" high: 124 cu ft, about 0.97 cord. With 16 in logs it holds 2 rows, about 0.79 cord or 2.4 face cords.
How big is a cord of firewood?
A full cord is 128 cu ft of tightly stacked wood: 4 ft high, 4 ft deep and 8 ft long. A face cord is one row 4 ft high and 8 ft long, so its volume depends on the log length.
Why does a firewood shed have gaps in the floor and walls?
Wood dries when air moves across it. The 9/16" floor gaps let air rise through the stack and let bark fall through, and the 1 in gaps between the wall slats let wind pass while the roof keeps the rain off.
How long does firewood take to season in the shed?
Most split hardwood needs 6 to 12 months under cover. Burn the oldest wood first: stack new wood on one side of the shed and take from the other.
Do I need a permit for a 4×8 firewood shed?
Rules for sheds vary by town and HOA, and some treat a roofed woodshed like any other shed. Check your local permit office before you build.
More about the 4×8 firewood shed plan
Inside the 4×8 firewood shed plan PDF
The 39-page PDF follows the build from start to finish, with 18 step-by-step sections. These are its parts in print order:
- How to use this plan: how to read the drawings, nominal and actual lumber sizes, 16 in on center layout and the build order with hours.
- Overview and dimensions: 3D views from the front and the back, the four elevations with every overall size, a side section and a drawing of each main part.
- Specs: footprint, roof footprint, stack space, capacity by log length, wall heights, the open front, heights above grade and the roof.
- Shopping list by section: every item with its quantity and what it is used for, grouped so each stage has its parts.
- Cut list: every part with its lumber and exact length.
- Cutting plan: which stock board each part comes from and how many cuts it gives.
- Tools and fasteners: the tool list and a fastener schedule for every joint.
- Preparation and ground breaking: layout, squaring with the diagonals and the gravel pad.
- Foundation skids, floor frame and decking: skid spacing, joist layout marks and the gapped deck boards.
- Walls: the back wall framed on the deck and tipped up, the open front wall built in place, both side walls.
- Join the walls: corners, strap ties and the bay cut-out.
- Rafters and roof: the rafter pattern with its cuts, sheathing, fascia, drip edge, felt and shingles.
- Wall slats: slat rows for the back and both sides, the spacer blocks and the cuts at the roof line.
- Finish, stacking and capacity: sealing, how to stack, and the capacity table by log length.
- Weather, snow and maintenance: anchoring, snow and wind notes, the spring check, and a build checklist to print.
Ready to build the 4×8 firewood shed?
$14.99 for the full PDF: every step, cut and board. 30-day money-back guarantee.