
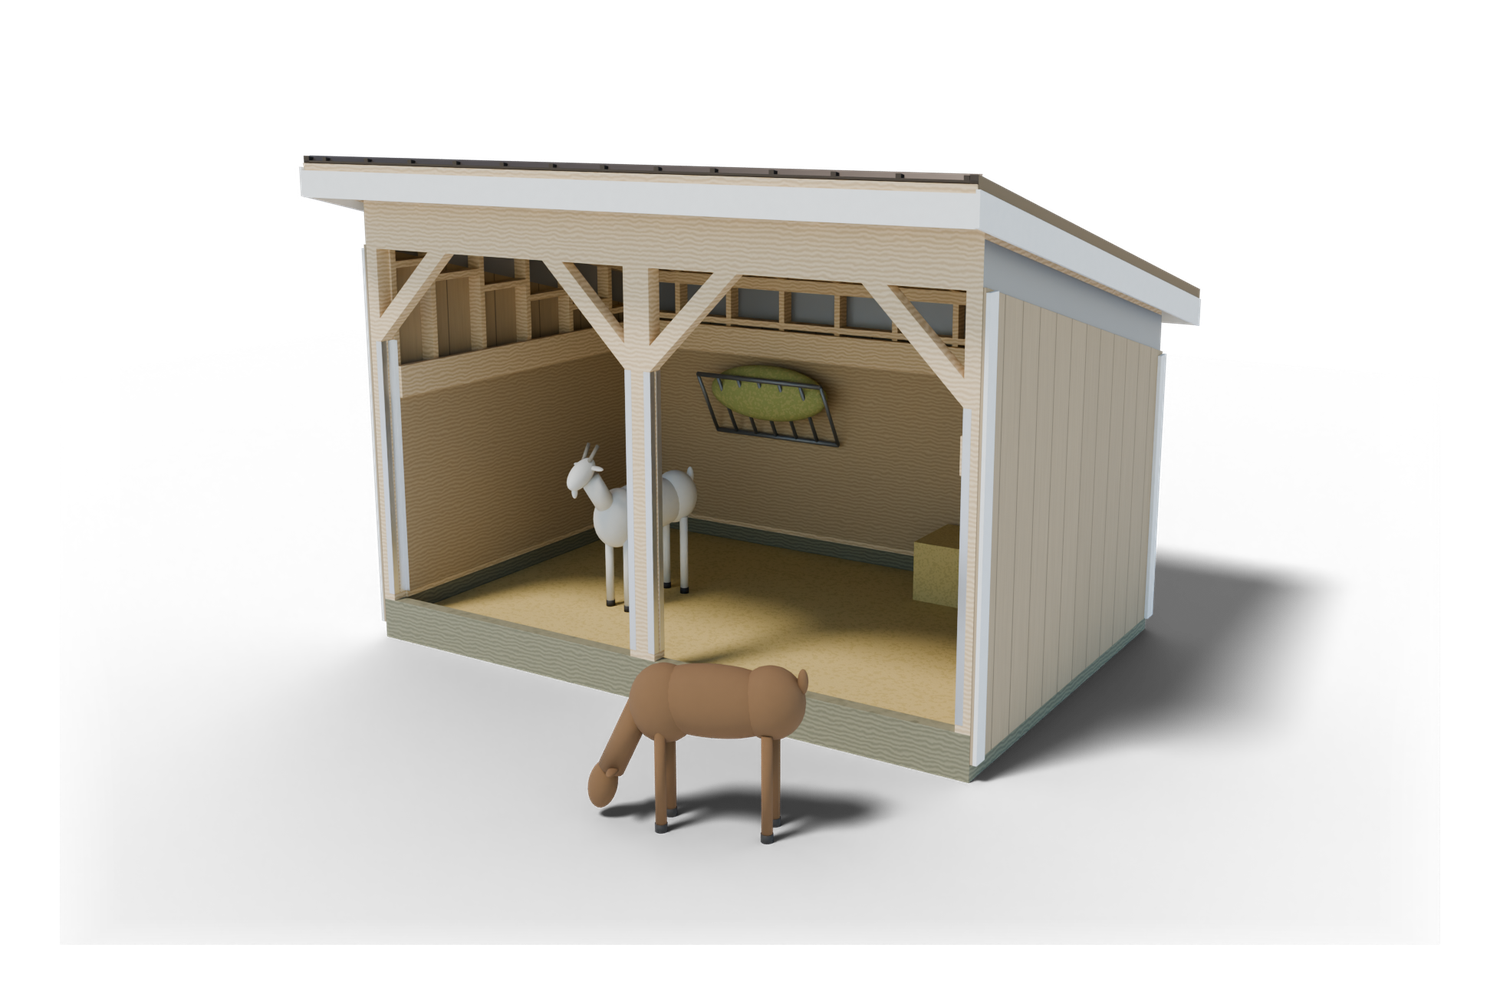
Goat run-in shelter · 96 sq ft
8x12 Goat Run-In Shelter Plan
Build this 8x12 goat run-in shelter yourself. Every board, cut and step, drawn in 3D across 40 pages.
- 30-day money-back guarantee
- PDF by email right after checkout
- Visa, Mastercard, Amex, PayPal
- Full material and shopping list
- Cut list with every length
- Step-by-step 3D views, 40 pages
- Phone, tablet, PC and Mac

The 3DSHEDPLANS™ 8x12 goat run-in shelter plan is a 40-page PDF for a three-sided shelter 12 ft wide and 8 ft deep, open along the front. It houses 4 to 5 standard goats or up to 6 dwarf goats, with an untreated chew-safe liner, a metal roof, a base on skids, a shopping list, a cut list and 13 step-by-step sections.
Get the full plan PDF for $14.99 or download the free preview
What builders say
A project for me and my son. The plan arrived in my email almost instantly, and everything we needed was included.
We aren't DIY-savvy and needed something simple. The plan was extremely well laid out and easy to follow.
A year ago I had only built flat-pack furniture. The plans are simple to follow, and you don't need years of experience.
8×12 goat shelter plans: what you get
These 8×12 goat shelter plans are for a three-sided run-in shelter 12 ft wide and 8 ft deep (96 sq ft), open along the 12 ft front, with room for 4 to 5 standard goats lying down at once. The PDF has 40 pages: a shopping list with quantities, a cut list with every length, a cutting plan and 13 step-by-step sections with 3D drawings, from the gravel pad to the last screw in the roof.
The shelter is built for goats from the ground up. It has no wood floor: the goats stand on gravel and bedding inside a 9 in high base box on two treated 4×4 skids, so you can tow it to fresh ground. The back and side walls are 2×4 frames with T1-11 siding outside and a 48 in untreated plywood liner inside, because goats chew and butt the walls. Steel guards cover the post corners they can reach, an 8 in screened gap under the roof lets damp air out above their heads, and the 3/12 roof is ribbed steel on 2×4 purlins, since goats climb roofs.
Every part in the lists is drawn on its step page, and the shopping list, the cut list and the drawings were checked against each other part for part before the plan went on sale. The 8×12 goat run-in shelter plan sells for $14.99 as an instant PDF download that works on a phone, a tablet or a printed copy.
How many goats fit in an 8×12 run-in shelter?
4 to 5 standard goats, or up to 6 dwarf goats such as Nigerian Dwarf or pygmy goats. The plan counts the bedded floor inside the liner, not the outside footprint: about 83 sq ft. At 15 to 20 sq ft per standard goat that is 4 to 5 goats lying down at once with room to move, and at 12 sq ft per dwarf goat it is 6.
Extension guides often allow 10 to 15 sq ft per goat in a shelter the goats can leave whenever they like, so these counts sit at the comfortable end. A run-in is a shelter, not a barn: the goats need a yard outside as well, about 25 sq ft per goat or more, and they come in to rest, eat and get out of the rain. Bucks, horned goats and a timid doe at the bottom of the pecking order all need more room, so keep the herd at the low number if yours includes them.
Rules on keeping goats, and how many you may keep on your lot, differ from town to town and between HOAs. Check your local rules for keeping goats before you buy lumber or animals.
8×12 goat run-in shelter specs
Every number below comes from the plan’s own specs page and step pages. Lumber sizes are nominal: a 2×4 is really 1 1/2 in by 3 1/2 in.
| Spec | Value |
|---|---|
| Footprint | 12 ft wide x 8 ft deep (96 sq ft) |
| Herd size | 4 to 5 standard goats (15 to 20 sq ft each), up to 6 dwarf goats (12 sq ft each), plus a yard outside |
| Bedded floor | about 83 sq ft inside the liner |
| Open front | 2 open bays, 5′ 6″ wide x 7′ 3 7/8″ clear high over the gravel |
| Wall heights | front (high) 7′ 5 1/8″, back (low) 5′ 6″ |
| Overall height | about 8′ 10 3/4″ above grade, to the top of the metal |
| Base | 2 treated 4×4 skids, treated 2×6 rims and end joists on treated 4×4 end sills, doubled inside; a box 9 in high, no floor: bedding goes on the gravel |
| Hold-down | 4 earth anchors with straps, 4 strap ties from the skids to the rims |
| Walls | 2×4 studs 16 in on center, 5/8 in T1-11 siding outside, 48 in untreated 3/4 in plywood liner inside |
| Chew protection | untreated liner, liner rail and 1×6 kick boards, 8 steel corner guards on the posts, 4′ 9 1/4″ tall |
| Vent | 8 in screened gap under the plates on the back and both sides |
| Roof | lean-to, 3/12, falls to the closed back, 1′ 0″ overhangs front and back, 4″ rakes |
| Rafters | 10 2×4 rafters 16 in on center plus 2 fly rafters |
| Roof covering | 7 2×4 purlins at 1′ 8 1/16″ or less, 5 ribbed 29 ga steel panels 128 in long, closure strips and trims |
| Front ramp | compacted crusher stone 5 in deep at the front rim, sloping out 24 in |
| Not included | a hay rack, feeders, water, fencing and the tow chain |
| The PDF | 40 pages, 13 step-by-step sections, about 67 hours of work |
The open front
The whole 12 ft front stays open, as on the run-in shelters farm extension sheets draw. It is split into 2 bays, each 5′ 6″ wide, by a middle post, and the clear height over the gravel is 7′ 3 7/8″, so you walk in standing up with a fork and a wheelbarrow to muck out. Goats walk in and out as they like, and a timid goat is never trapped in a corner by a bossy one.
The roof is high at the front (7′ 5 1/8″ wall) and falls to the closed back (5′ 6″ wall), so rain runs off behind the shelter and not into the doorway. A doubled 2×8 header spans each bay, with knee braces in its top corners against racking. The base box rim stays across the front: it holds the bedding in, and a ramp of compacted stone banked 5 in deep against it lets goats and a wheelbarrow roll over a 4 in lip.
Face the open side away from your worst winter wind and rain, usually south. The plan also shows how to close part of the front with a sheet of plywood screwed to the posts from inside in a hard winter, and how to take it off again in spring.
The vent gap under the roof
Goats breathe out moisture, and wet bedding gives off ammonia. A shelter with solid walls needs a way for that damp air to leave, or it drips and smells. This plan leaves an 8 in gap under the top plates of the back wall and under the sloped plates of both side walls. The siding stops on a flat 2×4 vent nailer between the studs, and the gap above it stays open all year.
The air leaves high, above the goats’ heads, so there is no draft at lying height, where the solid siding, the liner and the base box keep the wind out. Warm, wet air rises and goes out at the top, and the open front lets fresh air in. The roof overhang keeps rain out of the gap.
Every gap is covered with 1/2 in galvanized hardware cloth, cut in 12 in strips and screwed to the stud faces with 1 1/4 in screws and fender washers 4 in apart, so birds and rodents stay out. If rain blows in on a stormy side, the plan shows how to screw a 1×6 over the lower half of that side’s gap while the back vent stays open.
A chew-safe liner and kick boards
Goats chew wood and butt walls. Inside, the back and side walls get a 48 in liner of untreated 3/4 in exterior plywood, laid flat so the height is one sheet width (4 sheets in all). It is never pressure-treated: goats chew it, and treated-wood makers and extension guides keep treated wood out of a chewing animal’s reach. The liner is screwed to every stud with 2 in exterior screws 8 in apart and no glue, so a chewed piece comes off and a new one goes on.
The liner’s top edge is the part goats chew first, so an untreated 2×4 liner rail is screwed flat to the studs right on top of it, seated on the liner and an untreated 1×4 rail ledger. That leaves no chewable edge, no shelf and no lip for a goat to stand on.
Down low, the treated inner boards of the base box stand above the bedding, where a lying goat can gnaw them. Each one gets an untreated 1×6 kick board over it: 2 at 11′ 3″ along the front and back and 2 at 7′ 3″ along the sides, screwed in two rows. These are real parts on the shopping and cut lists. What stays treated within reach is small and low: the edge of the bottom plate, set back between the kick board and the liner, and the front rim in the open front, which goats step over.
Steel guards on the posts
The front posts are the one place goats can reach bare framing from both sides, and they chew and rub there. The plan covers every post corner a goat can reach with a 26 ga galvanized steel corner guard: 8 guards, each cut to 4′ 9 1/4″, from the plate up to just under the knee brace feet. On an end post that means its two inside corners (at the back the guard laps over the side liner’s front edge), and on a middle post all four corners.
The guards are screwed on with 1 in galvanized pan-head screws 8 in apart up both legs, pre-drilled with a 1/8 in bit, and the plan has you file or fold every cut end so nothing sharp is left at goat height. The posts stay unsealed: goats lick and chew inside the shelter below 5 ft, so nothing in their reach gets stain, sealer or paint.
Base box, skids and hold-down
A wood floor in a goat shelter soaks up urine and rots, and hooves catch in deck gaps, so this plan has none. Two treated 4×4 skids run under the front and back, treated 2×6 rims stand on them, and treated 2×6 end joists sit on treated 4×4 end sills between the skids, so the box is closed to the pad all round and no draft or rodent gets in at lying height. A second treated 2×6 inside all four sides doubles the box, so every wall plate bears on 3 in of wood. The box stands 9 in high and holds 3 to 6 in of bedding on the gravel pad’s own stone.
An empty open shelter catches wind like a sail, so hold-down is part of the plan, not an option. 4 auger earth anchors go into the ground beside the corners, each strap screwed to a skid’s outside face below the siding, and 4 flat strap ties tie the skids up to the rims, so the anchors hold the whole box and not just the skids.
To move it, take the anchor straps off, muck out, and tow it slowly by a chain through two holes in each skid, along the skids, over dry, level ground. Lay a new gravel pad and a new front ramp at the new spot and anchor it again. The tow chain is not on the shopping list.
A metal roof on purlins
Goats climb roofs, and shingles tear under hooves. This shelter has ribbed 29 ga steel panels on 2×4 purlins. Metal panel makers ask for solid support every 24 in or less, so the plan lays 7 purlins flat across the rafters at 1′ 8 1/16″ or less, with one at the low eave and one at the high edge so both panel ends are screwed down.
You need 5 panels, 128 in long, with 36 in coverage each; order them cut to length. The plan shows the order to lay them, with each side lap one rib over the last on a strip of butyl tape, 4 neoprene-washer screws across each panel at every purlin, foam closure strips at both eaves and trim on the rakes and the high edge. It also shows how to cut the last panel to width and how to work from a plank screwed to the purlins, because you never step on a metal panel.
The roof frame under the metal is 10 2×4 rafters 16 in on center and 2 fly rafters, at 3/12, with a hurricane tie on every middle rafter at both walls and 1′ 0″ overhangs front and back.
Bedding, hay and water
Spread 3 to 6 in of straw or wood shavings on the stone inside the box, never deeper than 6 in, so it stays under the top of the front rim and away from the siding. Add fresh bedding on top through the winter, then muck it out down to the gravel in spring: roll a wheelbarrow up the stone ramp and fork the bedding over the lip into it.
A hay rack is not part of this plan. The plan tells you where one fits if you buy or build it: on the back wall, its bottom about 30 in above the bedding, screwed through the liner into the studs and under the liner rail, or outside on a side wall or under the front overhang, where less hay ends up in the bedding. Keep water outside the shelter, on the gravel, so the bedding stays dry.
Materials list for the 8×12 goat run-in shelter
The plan’s shopping list has 64 items, grouped by building stage, and every board is listed in the stock length that wastes the least. Treated lumber goes only where wood touches the ground or the bedding. In short, this is what you buy:
- Framing lumber: 60 boards from 2x3s to 2x8s for the walls, the header, the knee braces, the rafters, the purlins and the liner rails
- Pressure-treated lumber: 20 boards for the skids, the base box, the bottom plates and the gravel pad frame
- Sheets, 4 by 8 ft: 7 of T1-11 siding and 4 of untreated 3/4 in plywood for the liner
- Trim boards: 14 1x4s and 1x6s for the fascia, corner trim, rail ledgers and kick boards
- Metal roofing: 5 ribbed steel panels, 10 closure strips, 6 pieces of trim and the roofing screws
- Hardware and stone: 4 earth anchors, 4 steel corner guards of 10 ft, 1 roll of hardware cloth, 2.3 cu yd of crushed stone and the nails, screws and ties
The full list of all 64 items, with the cut list, is in the plan PDF.
The plan does not list prices because lumber and steel costs change every week. Take the list to the pro desk of your lumber yard or farm store for a quote, and order the metal panels cut to length.
Tools you need
Nothing on this list is a specialty tool. If you can frame a simple wall, you can build this shelter: the walls are plain 2×4 frames, and the goat parts are straight cuts and screws.
- Circular saw, speed square and framing square for the framing and the rafter cuts
- Handsaw, wood chisel, flat pry bar and a rasp to cut the bottom plate out of the open front
- Drill/driver with bits, including a 1 1/2 in spade bit for the tow holes
- 3 lb sledge for the pad frame spikes and stakes
- Framing hammer, or a framing nailer and compressor
- 4 ft level, an 8 ft straight board and a string line for the skids, walls, rafters and purlins
- 25 ft tape, chalk line and a carpenter’s pencil
- 8 ft step ladder, two sawhorses, two clamps and one 2×10 plank to kneel on at the roof
- Tin snips or a metal-cutting blade and a 5/16 in nut driver bit for the roofing screws
- Shovel, rake, hand tamper and wheelbarrow for the gravel pad and the front ramp
- Safety glasses, hearing protection and cut-resistant gloves for the metal
Use hot-dip galvanized or coated exterior fasteners everywhere: treated lumber corrodes plain steel, and a shelter full of bedding is a damp place.
How to build the 8×12 goat run-in shelter, step by step
The PDF splits the build into 13 step-by-step sections, each with numbered steps, measured drawings and a 3D view with the new parts in orange. This is the order the plan follows:
Step 1: Lay out the site and the gravel pad
Stake the corners 12 ft by 8 ft, square them until both diagonals read 14′ 5 1/16″, and build a compacted crushed stone pad 14′ 0″ by 10′ 0″ in a treated 4×6 frame.
Step 2: Build the base box
Level the skids, set the end sills, rims and end joists, double the box with a second treated 2×6 inside, drill the tow holes, nail on the 4 skid straps and set the 4 earth anchors.
Step 3: Frame and raise the back wall
Frame it flat on level ground, raise it onto the base box with a helper and brace it.
Step 4: Build the front and the open bays
Set the posts and the doubled header one light piece at a time, then the knee braces.
Step 5: Frame the side walls and join the walls
Frame both side walls with their sloped plates, tie the corners, cut the plate out of the bays, bank the stone front ramp and tie every stud to its top plate.
Step 6: Cut and set the rafters
Cut the 10 rafters from the pattern, set them with hurricane ties, add the blocking and the rake overhang.
Step 7: Purlins and fascia
Mark the purlin lines, screw the 7 purlins flat across the rafters and nail on the fascia.
Step 8: Metal roofing
Lay the closure strips, then the 5 panels with lapped, taped seams, and finish with the trims.
Step 9: Siding, liner and vent
Nail the vent nailers and the 7 sheets of T1-11, add the corner trim and vent cloth, then the untreated liner, its ledger and rail, the kick boards and the post guards.
Step 10: Bedding and finish
Seal the framing above the goats’ reach, paint the siding, spread the bedding and let the goats in.
The plan’s time table for one person:
| Stage | Typical time |
|---|---|
| Site and gravel pad | 12 h |
| Cutting, skids, base box | 7 h |
| Walls and braces | 17 h |
| Roof: rafters, purlins, metal | 17 h |
| Siding, liner and vent cloth | 14 h |
That is about 67 hours in all, 4 to 5 full weekends for a first-timer. The skill level is basic framing: measuring, square cuts, nailing and checking level and plumb. The back wall and the plywood liner sheets are two-person lifts, and the plan says when a helper is needed.
Where to put a goat run-in shelter
- Drainage. Pick high ground that drains well, away from low spots where water stands. The shelter sits on a compacted gravel pad larger than the base box, so rain drains away from the skids and the bedding stays dry.
- Wind. Face the open front away from your worst winter wind and rain, usually south. The closed back then takes the weather.
- Stone pad and ramp. The pad is 4 in of compacted crusher run in a treated 4×6 frame, 12 in past the shelter all round, and the front ramp is the same stone. Rake the ramp back up every spring.
- Climbing. Goats climb. Keep the shelter away from fences, spools and rocks they could jump from onto the roof, and do not stack anything against the walls.
- Distance. Many towns set how far an animal shelter must stand from property lines, wells and houses. Check your local rules for keeping goats and your local permit office before you pick the spot.
- Room to move it. Leave a clear, level path for a tractor or truck if you plan to tow the shelter to fresh ground.
What is in the free 8×12 goat run-in shelter plan preview?
Download the free 8×12 goat run-in shelter plan preview before you buy. It shows the shelter from the front and the back, the build stages in order and real pages from the plan, so you can see how the drawings look and whether the size fits your herd and your pasture.
| Item | Free preview | Full plan |
|---|---|---|
| Overview, 3D views and build stages | Yes | Yes |
| Material list with quantities | No | Yes |
| Cut list for every part | No | Yes |
| Measurements in every step | Overall sizes | Every part |
| Step-by-step drawings | Preview pages | 40 pages, 13 sections |
| Liner, kick board, guard, vent and metal roof details | No | Yes |
| Price | Free | $14.99 |
Not right for you? Email [email protected] within 30 days of your purchase for a full refund.
Before you build
Rules for keeping goats (how many, distance to the property line, wells and houses) and for small farm buildings (size, height, setbacks, permits) vary by town, county and HOA. Check your local rules for keeping goats and check your local permit office before you build.
This plan uses common light framing on skids. Heavy snow areas or high-wind spots may need more anchors or heavier framing; your local permit office knows the loads for your address. If you keep sheep with the goats, ask your vet about copper in treated wood: sheep are far more sensitive to it than goats.
Every spring, re-snug the roofing screws and replace any with a cracked washer, look for chewed liner edges and loose vent cloth, muck out to the gravel, rake the front ramp back up and check that the skids are still level.
Frequently asked questions
How many goats fit in an 8×12 run-in shelter?
4 to 5 standard goats at 15 to 20 sq ft of bedded floor each, or up to 6 dwarf goats. Give them a yard outside too, about 25 sq ft per goat or more.
Is any treated wood within a goat's reach?
The 48 in liner, its rail and the kick boards are untreated, and steel guards cover the post corners. Treated wood is used only where it touches the ground or the bedding, low down.
Does the shelter need a floor?
No. The goats stand on gravel and 3 to 6 in of bedding inside the base box, which you muck out down to the gravel in spring. A wood floor would soak up urine and rot.
Is a hay rack included in the plan?
No. The plan shows where a bought or homemade hay rack fits, on the back wall or outside, but the rack is not on the shopping list.
Do I need a permit for an 8×12 goat shelter?
Rules for farm buildings and for keeping goats vary by town, county and HOA. Check your local rules for keeping goats and check your local permit office before you build.
More about the 8×12 goat run-in shelter plan
Inside the 8×12 goat run-in shelter plan PDF
The 40-page PDF follows the build from start to finish, with 13 step-by-step sections. These are its parts in print order:
- How to use this plan: how to read the drawings, nominal and actual lumber sizes, 16 in on center layout, the two-person lifts and the build order with hours.
- Overview and dimensions: 3D views from the front and the back, the front, back and side elevations with every overall size, and a drawing of each main part.
- Specs: footprint, roof footprint, herd size, the open front, the base, wall heights, overall height, walls, roof, rafters and the metal roof covering.
- Shopping list by section: every item with its quantity and what it is used for, grouped so each stage has its parts.
- Cut list: every part with its lumber and exact length.
- Cutting plan: which stock board each part comes from and how many cuts it gives.
- Tools and fasteners: the tool list, a fastener schedule for every joint and a connectors table that says where each tie goes.
- Preparation and ground breaking: siting, squaring the layout with the diagonals and the gravel pad in its treated frame.
- Base box: skids, rims, end joists and end sills, the doubled box, tow holes, skid straps and the four earth anchors.
- Back wall: framed flat, raised onto the base box and braced.
- Front wall and open bays: the posts, the header and the knee braces, built in place one light piece at a time.
- Left wall and right wall: the side walls with their sloped top plates.
- Join the walls: corners, the second top plates, corner straps, cutting the plate out of the bays, the stone front ramp and the stud-to-plate ties.
- Rafters and setting the rafters: the rafter pattern with its cuts, hurricane ties, blocking and the rake overhang.
- Purlins and fascia: the purlin lines marked on the rafters, the purlins and the fascia.
- Metal roofing: closure strips, panel order, the screw pattern, side laps with butyl tape, the last panel and the trims.
- Siding, liner and vent: vent nailers, T1-11 siding, corner trim, vent cloth, the untreated liner with its rail and ledger, the kick boards and the post guards.
- Bedding, finish and herd size: what to seal and what to leave bare, bedding depth, where a hay rack can go and how many goats fit.
- Weather, care and maintenance: rain and winter tips, the spring check and moving day.
Ready to build the 8×12 goat run-in shelter?
$14.99 for the full PDF: every step, cut and board. 30-day money-back guarantee.