
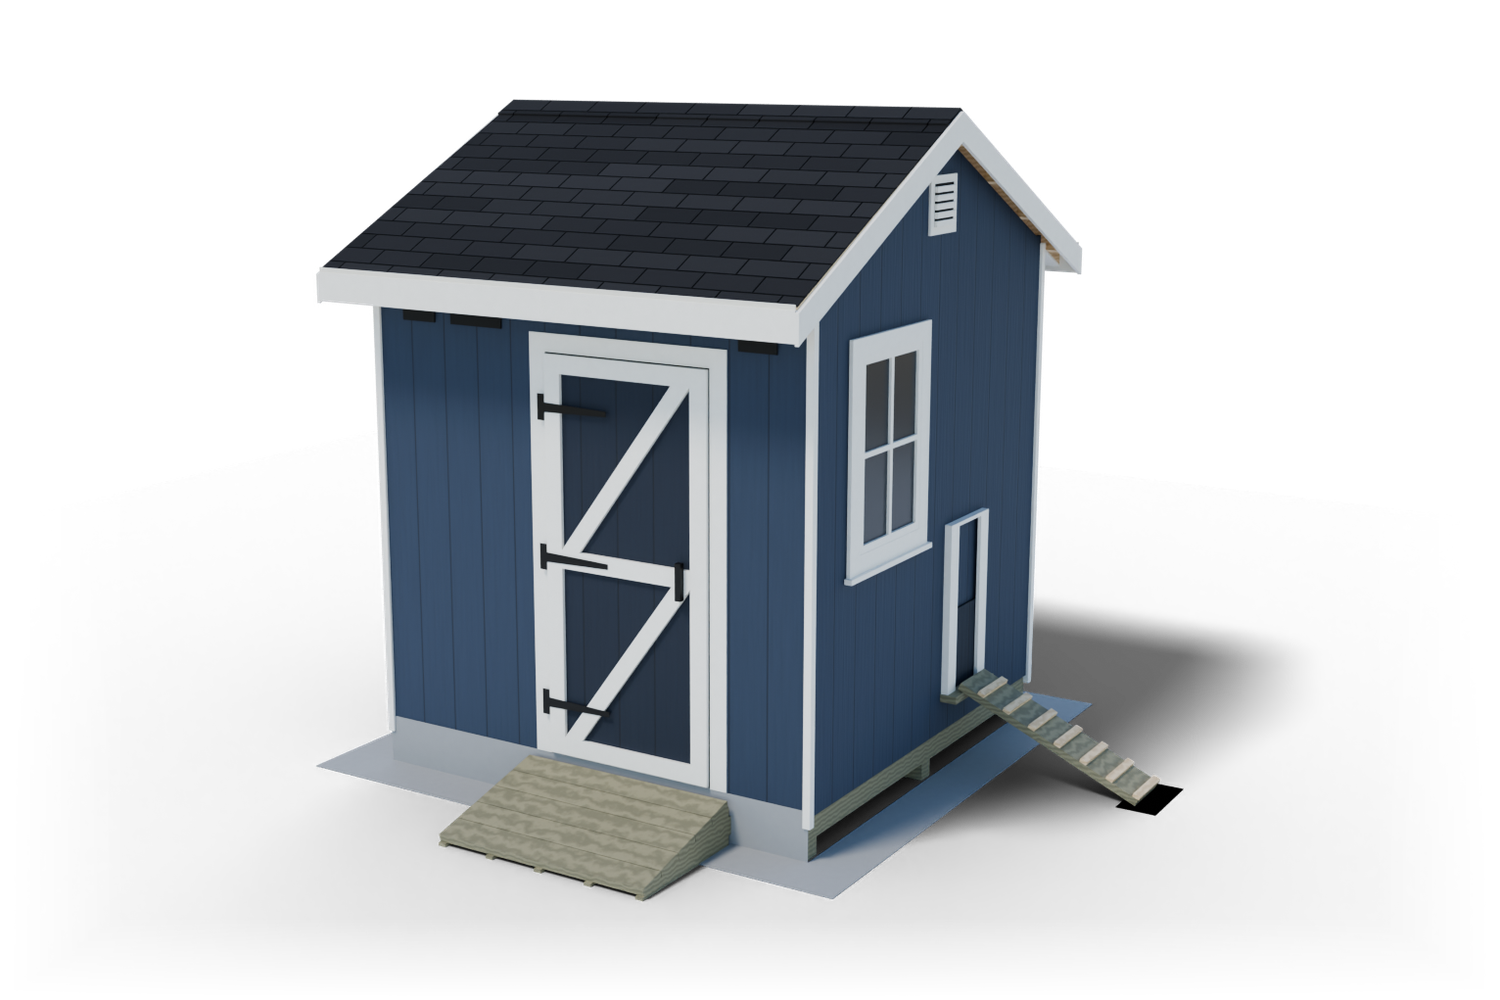
Walk-in chicken coop · 64 sq ft
8x8 Walk-In Chicken Coop Plan
Build this 8x8 walk-in chicken coop yourself. Every board, cut and step, drawn in 3D across 88 pages.
- 30-day money-back guarantee
- PDF by email right after checkout
- Visa, Mastercard, Amex, PayPal
- Full material and shopping list
- Cut list with every length
- Step-by-step 3D views, 88 pages
- Phone, tablet, PC and Mac

The 3DSHEDPLANS™ 8x8 walk-in chicken coop plan is a 88-page PDF for a coop 8 ft wide and 8 ft deep with a 36 in walk-in door. It houses up to 16 hens with a run, with 4 nest boxes you open from outside, 2 roost bars, screened vents, a shopping list, a cut list and 24 step-by-step sections.
Get the full plan PDF for $19.99 or download the free preview
What builders say
I worked as a joiner's assistant for three years and was skeptical. The plan was well laid out and beautifully illustrated.
A project for me and my son. The plan arrived in my email almost instantly, and everything we needed was included.
We aren't DIY-savvy and needed something simple. The plan was extremely well laid out and easy to follow.
8×8 chicken coop plans: what you get
These 8×8 chicken coop plans are for a walk-in hen house 8 ft wide and 8 ft deep (64 sq ft) with room for up to 16 standard hens when they also have a run. The PDF has 88 pages: a shopping list with quantities, a cut list with every length, and 24 step-by-step sections with 3D drawings, from the gravel pad to the last screw in the hardware cloth.
The coop is built like a small gable shed, so it lasts like one: pressure-treated 4×4 skids, a raised floor, 2×4 walls, T1-11 siding and a 6/12 shingled roof. Inside you stand up, walk in through a 36 in door with a wheelbarrow, and clean out the bedding without crawling. The hen parts are built in: 4 nest boxes in a bump-out on the back wall with a lid outside, 2 roost bars over a lift-out droppings board, a sliding pop door with a hen ramp, screened vents high under the eaves and a hardware cloth skirt around the base against diggers.
Every part in the lists is drawn on its step page, and the shopping list, the cut list and the drawings were checked against each other part for part before the plan went on sale. The 8×8 walk-in chicken coop plan sells for $19.99 as an instant PDF download that works on a phone, a tablet or a printed copy.
How many chickens fit in an 8×8 coop?
Up to 16 standard hens. The plan counts 4 sq ft of coop footprint per hen, the common rule for a coop with a run where the birds spend the day outside: 64 sq ft divided by 4 is 16. Inside the framing the floor is about 55 sq ft, so the walk-in room stays usable for you as well.
Bantams need about two thirds of the room, so the same coop takes about 24 of them. Hens kept inside all day, in deep snow or with no run at all need more room, so plan on fewer birds then. The nest boxes, the roost length and the vent area are all sized for 16 hens, so the coop works at that count without crowding the roosts or the nests.
Rules on how many hens you may keep, and on roosters, differ from town to town and between HOAs. Check your local rules for keeping hens before you buy lumber or birds.
8×8 walk-in chicken coop specs
Every number below comes from the plan’s own facts and specs pages. Lumber sizes are nominal: a 2×4 is really 1 1/2 in by 3 1/2 in.
| Spec | Value |
|---|---|
| Footprint | 8′ 0″ wide x 8′ 0″ deep (64 sq ft) |
| Hens | up to 16 standard hens with a run (4 sq ft each), or about 24 bantams |
| Nest boxes | 4, opened from outside under a hinged lid, 1′ 0 13/16″ wide x 1′ 2 1/8″ deep inside, floors 2′ 0″ above the coop floor |
| Roosts | 2 bars x 7′ 4 3/4″ = 14′ 9 1/2″ (11 in per hen), tops 2′ 10″ above the floor, 1′ 0″ apart |
| Droppings board | 2′ 8″ deep under the roosts, 1′ 10″ above the floor, lifts out |
| Vents (always open) | 7.6 sq ft of screened vent area high in the walls and gables |
| Pop door | 12 by 14 in opening in the right wall, sliding, with a 24 degree cleated hen ramp |
| People door | 36 in wide walk-in door, opens out, two latches |
| Window | one window (24 by 36 in rough opening) |
| Predator-proofing | 1/2 in hardware cloth on every vent and the window, 1′ 8 3/4″ skirt around the base |
| Walls and roof | 2×4 walls 7′ 10 1/2″ tall, 5/8 in T1-11 siding, 6/12 roof with 7/16 in OSB, felt and 3-tab asphalt shingles |
| Floor | pressure-treated 4×4 skids and 2×6 joists, 3/4 in plywood 9 3/4″ above grade, sheet vinyl on top |
| Overall height | about 10′ 11 5/16″ above grade |
| Not included | a run, electrics, lights and heat |
| The PDF | 88 pages, 24 step-by-step sections |
Nest boxes you open from outside
The plan has 4 nest boxes, one for every 4 hens, which is plenty: hens share boxes and often all pick the same one. The boxes sit in a bump-out on the back wall, so they take no floor space inside. Each box is 1′ 0 13/16″ wide, 1′ 2 1/8″ deep and 1′ 2 1/4″ tall inside, with its floor 2′ 0″ above the coop floor.
A sloped lid on the outside lifts on two strap hinges, and a hook holds it open while you collect eggs without walking in or disturbing the flock. A bedding lip keeps the nesting material in, and two hasps with snap hooks keep raccoons out. The lid slope is steep enough that hens do not sit on it and rain runs off.
The nests are lower than the roost bars on purpose. Hens sleep on the highest perch they can reach, so with the roosts at 2′ 10″ they sleep there and not in the boxes, and the eggs stay clean.
Roost bars and a droppings board
Chickens sleep on a perch, and most guides ask for about 8 to 12 in of roost per standard hen. The plan aims for 10 in and gives 2 bars, each 7′ 4 3/4″ long, 14′ 9 1/2″ in all, or about 11 in per hen at the full count. The bars are 2x4s laid wide side up, so the birds cover their feet with their bodies on cold nights, with the top edges rounded, set 1′ 0″ apart and 2′ 10″ above the floor along the left wall.
Most droppings fall at night under the roosts. A droppings board 2′ 8″ deep sits 1′ 10″ above the floor under the bars and lifts out in two halves, so you scrape it into a bucket and the bedding on the floor stays clean much longer. Nothing else goes under the roosts: no feeder, no waterer and no nest box.
Ventilation that stays open all year
Hens breathe out a lot of moisture, and their droppings give off ammonia. A closed, damp coop is what causes frostbitten combs and breathing trouble in winter, more than cold air does. The usual rule of thumb is 1 sq ft of vent for every 10 sq ft of floor, about 6.4 sq ft here.
This coop has 7.6 sq ft of vents that never close: screened holes at the top of the stud bays in the front and back walls (1059 sq in), right under the eaves, plus louvered vents in both gables (35 sq in). They sit above the roosts, so warm, wet air leaves at the top while the birds sleep out of the draft. The roof eaves keep rain out of the holes, and the window opens for extra air in summer.
Every vent hole is covered with 1/2 in hardware cloth screwed on with washers, and the plan draws each hole with its size, so you cut them in the siding after the walls are up.
Predator-proofing: hardware cloth and a skirt
Raccoons, foxes, weasels, rats and dogs all go after backyard hens, and chicken wire keeps chickens in but does not keep predators out. This plan uses 1/2 in galvanized welded hardware cloth everywhere there is an opening: every vent hole, behind both gable vents and over the window, screwed down every 4 in with fender washers, not stapled.
Diggers go under walls, so a 1′ 8 3/4″ hardware cloth skirt runs all the way around the base. It is screwed over the bottom edge of the siding, runs down to the gravel and lies flat for 11″ out from the wall, pinned with landscape staples. A fox or a dog that digs at the wall meets the wire. The plan’s shopping list has 5 rolls of 36 in hardware cloth for all of it.
Doors and lids get two latches each, because raccoons learn to open one. The people door has its latch plus a hasp, and every door and lid takes a snap hook as its second catch. Shut the pop door every night once the hens are on the roosts.
A walk-in door, a raised floor and easy cleaning
The 36 in people door is the big difference from a small backyard coop. You walk in standing up to fill the feeder, change the water and shovel out the bedding into a wheelbarrow, and a drop-in board across the bottom of the door keeps the bedding in when it opens. The door opens out, so it never pushes against the bedding or a hen.
The floor is 3/4 in plywood on pressure-treated 2×6 joists, 9 3/4″ above grade on 4×4 skids, so air moves under it and the wood stays dry. Sheet vinyl covers the floor and runs 12 in up the walls, so wet bedding never touches the wood and the floor scrapes clean. Spread 4 to 6 in of pine shavings on top, add fresh shavings as they get dirty, and shovel the whole bed out into the wheelbarrow when it is spent.
The pop door, the hen ramp and adding a run
The hens come and go through a 12 by 14 in pop door in the right wall. Its plywood panel slides up and down in wood guides, and its bottom sits 8″ above the floor so the bedding does not spill out. A barrel bolt holds it open or shut, and a pull handle lifts it.
Outside, a pressure-treated 2×12 hen ramp 3′ 8 3/4″ long runs down at about 24 degrees to a paver on the gravel, with cleats every 6 in for grip. It hooks onto a ledger under the door, so it lifts off when you mow.
A run is not included in this plan. A run attaches on the pop door side, so the hens step straight from the ramp into it. Build it from posts and 1/2 in hardware cloth, with the same buried or flat skirt, and a covered top if hawks hunt in your area. The hen count above assumes the birds have a run for the day.
Materials list for the 8×8 walk-in chicken coop
The plan’s shopping list has 115 items, grouped by building stage, and every board is listed in the stock length that wastes the least. In short, this is what you buy:
- Framing lumber: 82 2x4s, 2x6s and 2x8s for the walls, the roof, the roosts and the nest box
- Pressure-treated lumber: 24 boards for the skids, the floor frame, the two ramps and the gravel pad frame
- Sheets: 10 of T1-11 siding, 5 of OSB for the roof and 7 of plywood for the floor, nest boxes, droppings board and soffit
- Trim: 27 boards from 1x2s to 1x8s for the fascia, corners, door and coop fittings
- Roofing: 4 bundles of shingles, 1 roll of felt and 6 pieces of drip edge
- Hardware cloth and hardware: 5 rolls of 1/2 in hardware cloth, plus the nails, screws, hinges, latches, ground anchors and gravel
See the full 8×8 coop material list (115 items), with every quantity, what each item is for and the cut list.
The plan does not list prices because lumber costs change every week. Take the list to the pro desk of your lumber yard or home center for a quote; they can pull it in one order.
Tools you need
Nothing on this list is a specialty tool. If you can frame a small shed, you can build this coop: the shell steps are the same, and the hen parts are simple cuts and screws.
- Circular saw, speed square and framing square for the framing and the rafter cuts
- Jigsaw and an oscillating multi-tool for the vent holes in the siding
- Drill/driver with bits for the screws and pilot holes near board ends
- Framing hammer, or a framing nailer and compressor
- 4 ft level, an 8 ft straight board and a string line for the skids, walls and rafters
- 25 ft tape, chalk line and a carpenter’s pencil
- Step ladder, two sawhorses and two clamps
- Tin snips and a utility knife for the hardware cloth, felt, shingles and vinyl
- Staple gun and caulk gun
- Shovel, rake and hand tamper for the gravel pad
- Leather gloves, safety glasses and hearing protection: cut hardware cloth ends are sharp
Use galvanized or coated exterior fasteners everywhere: pressure-treated lumber corrodes plain steel, and a coop is a damp place.
How to build the 8×8 walk-in chicken coop, step by step
The PDF splits the build into 24 step-by-step sections, each with numbered steps, measured drawings and a 3D view with the new parts in orange. This is the order the plan follows:
Step 1: Lay out the site and the gravel pad
Mark the corners 8′ 0″ by 8′ 0″, square them by the diagonals, strip the sod past the coop on every side and spread compacted 3/4 in crushed stone.
Step 2: Set the skids and build the floor
Level the pressure-treated 4×4 skids, build the 2×6 floor frame 16 in on center, square it and glue and screw the 3/4 in plywood on top.
Step 3: Frame and raise the walls
Frame each wall flat on the floor with its openings: the 36 in door, the window, the nest box opening in the back wall and the pop door. Raise the bare frames, plumb and brace them, join the corners and hang the T1-11 siding.
Step 4: Frame and roof the coop
Set the ridge and the rafters for the 6/12 roof, then the OSB, fascia, drip edge, felt and shingles.
Step 5: Door, window, trim and paint
Build and hang the people door, set the window and add the trim. Paint the outside before the hen parts go in.
Step 6: Cut and screen the vent holes
Cut the vent holes high in each stud bay of the front and back walls, add the nailers and screw 1/2 in hardware cloth over every hole and behind both gable vents.
Step 7: Build the nest box bank
Build the bump-out for the 4 nest boxes on the back wall, with dividers, the bedding lip, the hinged lid and its latches.
Step 8: Pop door and hen ramp
Screw the guides beside the pop door, slide in the panel, then fix the ramp ledger and hook on the cleated hen ramp over its paver.
Step 9: Roosts and droppings board
Screw the ledgers to the front and back walls, drop in the 2 roost bars and set the droppings board under them.
Step 10: Window screen, floor and skirt
Fit the screen frame in the window, lay the sheet vinyl up the walls, then screw the 1′ 8 3/4″ hardware cloth skirt around the base and pin it to the ground.
The skill level is basic framing: measuring, square cuts, nailing and checking level and plumb. Two people make the wall raising and the roof sheathing easier, and the plan says when a helper is needed.
Where to put a chicken coop
- Drainage. Pick high, dry ground where water does not stand after rain. The coop sits on a gravel pad larger than the coop, so rain drains away from the skids.
- Distance. Many towns set how far a coop must stand from property lines and from houses. Check your local rules for keeping hens and your local permit office before you pick the spot.
- Sun and shade. Morning sun dries the run, and afternoon shade keeps the coop cooler in summer. Hens handle cold better than heat.
- Wind. Face the people door away from the winter wind if you can.
- Room for the run. Leave space on the pop door side, where the run attaches, and a path to the door for a wheelbarrow.
- Water and power. A hose nearby makes chores easier. The plan has no electrics; any wiring for lights or a heated waterer is a job for an electrician.
What is in the free 8×8 walk-in chicken coop plan preview?
Download the free 8×8 walk-in chicken coop plan preview before you buy. It shows the coop from the front and the back, the build stages in order and real pages from the plan, so you can see how the drawings look and whether the size fits your yard.
| Item | Free preview | Full plan |
|---|---|---|
| Overview, 3D views and build stages | Yes | Yes |
| Material list with quantities | No | Yes |
| Cut list for every part | No | Yes |
| Measurements in every step | Overall sizes | Every part |
| Step-by-step drawings | Preview pages | 88 pages, 24 sections |
| Nest box, roost, vent and pop door details | No | Yes |
| Price | Free | $19.99 |
Not right for you? Email [email protected] within 30 days of your purchase for a full refund.
Before you build
Rules for keeping hens (how many, roosters, distance to the property line and to houses) and for small buildings (size, height, permits) vary by town and HOA. Check your local rules for keeping hens and check your local permit office before you build.
This plan uses common small-shed framing. Heavy snow areas or high-wind zones may need closer rafter spacing, larger rafters or anchors to the ground; your local permit office knows the loads for your address.
Every spring, check the roof for lifted shingles, look over the hardware cloth and the skirt for gaps, tighten the latches and make sure the skids are still level. More coop plans are on the chicken coop plans page, and the same shell is drawn as a storage shed on the gable shed plans page.
Shed building guides
- 8×8 Chicken Coop Material List: Lumber, Sheets, Hardware
- 4×8 Shed Material List: Lumber, Sheets, Hardware
- 4×6 Lean-To Shed Material List: Lumber, Sheets, Hardware
- 16×20 Lean-To Shed Material List: Lumber, Sheets, Hardware
- 16×16 Shed Material List: Lumber, Sheets and Hardware
- How to Insulate a Shed: Walls, Roof and Floor
Frequently asked questions
How many chickens fit in an 8×8 walk-in coop?
Up to 16 standard hens with a run, at 4 sq ft of coop each, or about 24 bantams. Hens kept inside all day need more room, so keep fewer then.
How many nest boxes and how much roost space do I need?
One nest box per 4 hens and about 8 to 12 in of roost per hen. This coop has 4 nest boxes and 2 roost bars, 14' 9 1/2" in all.
How much ventilation does a chicken coop need?
A common rule is 1 sq ft of vent per 10 sq ft of floor. This coop has 7.6 sq ft of screened vents high in the walls and gables that stay open all year, above the roosts.
Does the plan include a chicken run?
No. The plan covers the walk-in coop. A run attaches on the pop door side, built from posts and 1/2 in hardware cloth with a skirt along its base.
Do I need a permit for an 8×8 chicken coop?
Rules for coops and for keeping hens vary by town and HOA. Check your local rules for keeping hens and check your local permit office before you build.
More about the 8×8 walk-in chicken coop plan
Inside the 8×8 walk-in chicken coop plan PDF
The 88-page PDF follows the build from start to finish, with 24 step-by-step sections. These are its parts in print order:
- How to use this plan: how to read the drawings, nominal and actual lumber sizes, 16 in on center layout and the build order.
- Overview and dimensions: 3D views from the front and the back, the four elevations with every overall size and the coop facts: hens, nests, roosts and vents.
- Specs: footprint, wall and roof heights, every rough opening, the floor and the roof.
- Shopping list by section: every item with its quantity and what it is used for, grouped so each stage has its parts.
- Cut list and cutting plan: every part with its lumber and exact length, and which stock board each part comes from.
- Tools and fasteners: the tool list and a fastener schedule for every joint.
- Preparation, skids and floor: layout, squaring with the diagonals, the gravel pad, the skids and the raised floor.
- Walls: each wall framed flat with its door, window, nest box and pop door openings, raised, joined and sided.
- Roof: rafters, sheathing, fascia, drip edge, felt and shingles.
- Door, window, trim and paint: the 36 in walk-in door, the window and the trim.
- Vent holes and screens: the screened vent holes high in the front and back walls and the gable vents.
- Nest box bank: the bump-out on the back wall with its dividers, lip and outside lid.
- Pop door and hen ramp: the sliding pop door in its guides and the cleated ramp.
- Roosts and droppings board: the roost bars on their ledgers and the lift-out droppings board.
- Window screen, floor and skirt: the window screen, sheet vinyl on the floor and the hardware cloth skirt.
Ready to build the 8×8 walk-in chicken coop?
$19.99 for the full PDF: every step, cut and board. 30-day money-back guarantee.
© 2026 Netholics Media, LLC. Personal-use license: build it yourself, never share or resell the PDF. Plan license · Copyright