
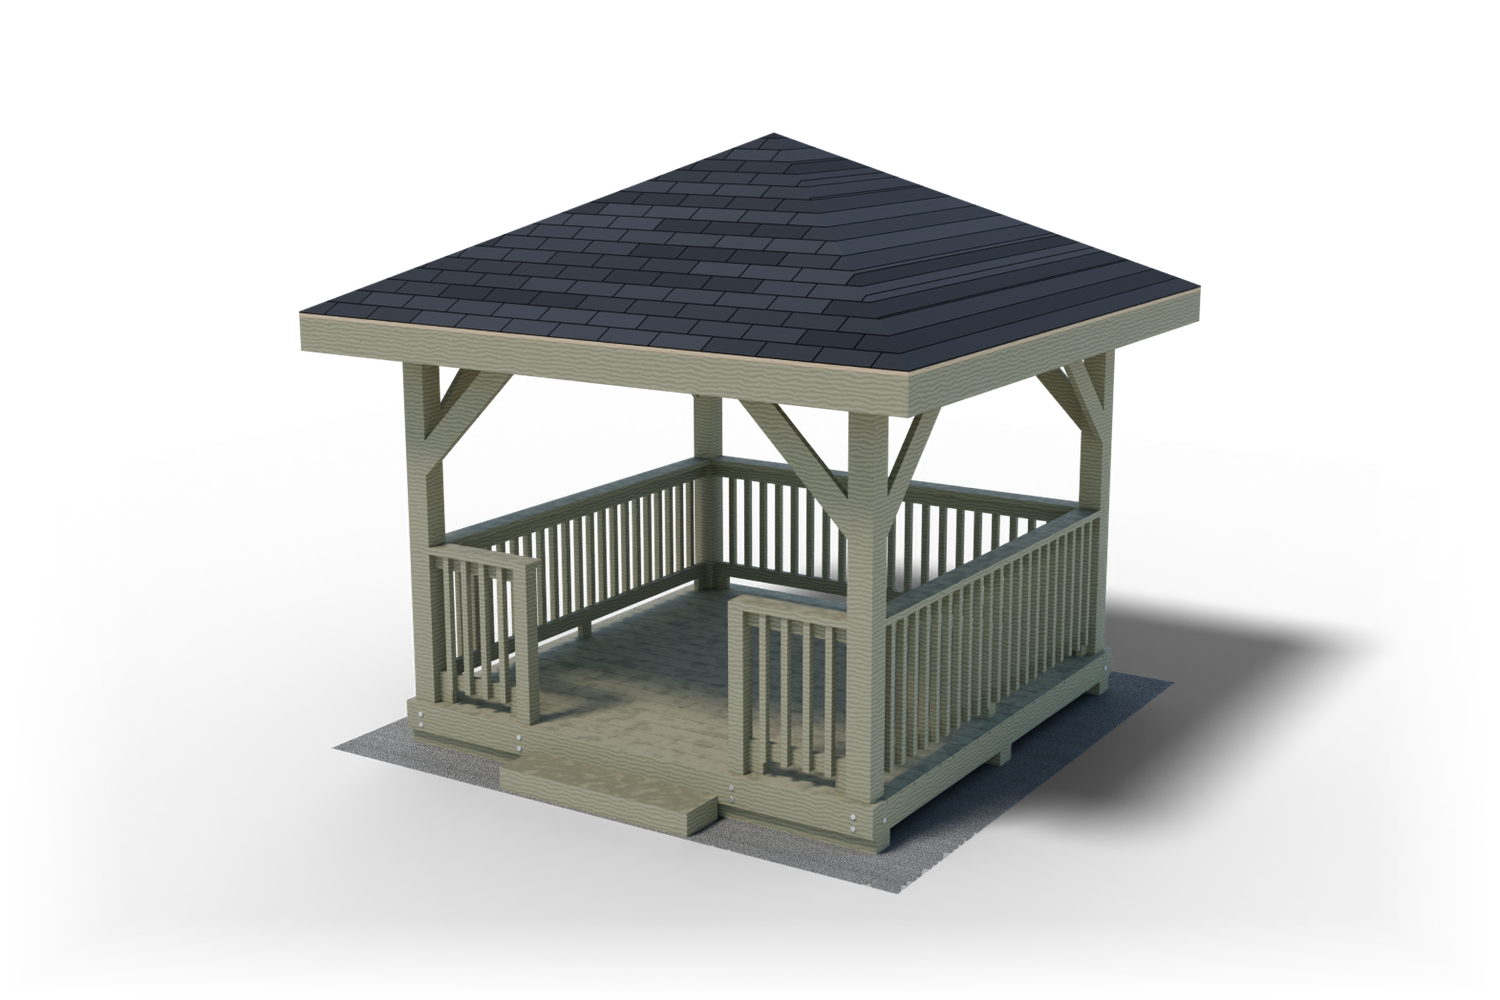
Hip roof gazebo · 100 sq ft
10x10 Hip Roof Gazebo Plan
Build this 10x10 hip roof gazebo yourself. Every board, cut and step, drawn in 3D across 41 pages.
- 30-day money-back guarantee
- PDF by email right after checkout
- Visa, Mastercard, Amex, PayPal
- Full material and shopping list
- Cut list with every length
- Step-by-step 3D views, 41 pages
- Phone, tablet, PC and Mac

The 3DSHEDPLANS™ 10x10 hip roof gazebo plan is a 41-page PDF for a square backyard gazebo 10' 0" by 10' 0" at the floor, with a deck floor on skids, railings on three sides, 6' 10 1/4" of clear height under the beams and a 6/12 shingled hip roof on four 6x6 posts. It has a shopping list, a cut list and 13 step-by-step sections.
Get the full plan PDF for $19.99 or download the free preview
What builders say
The illustrations are fantastic, and the shopping list helped me buy the right materials. It took me five days to build my shed.
Pre-built sheds were hundreds of dollars. The plan laid everything out perfectly, and I saved hundreds in the process.
I worked as a joiner's assistant for three years and was skeptical. The plan was well laid out and beautifully illustrated.
10×10 gazebo plans: what you get
These 10×10 gazebo plans are for a square backyard gazebo, 10′ 0″ on each side at the floor (100 sq ft of deck), with a four-sided hip roof that meets at one peak. It is a classic garden gazebo: a raised wood floor, railings around three sides, an open entry on the front and a shingled roof that keeps sun and rain off a table or a pair of chairs. The PDF has 41 pages: a shopping list by building stage, a cut list with every length and the boards to buy, and 13 step-by-step sections with measured drawings and 3D views, from the gravel pad to the last hip cap.
The base needs no holes and no concrete. Three treated 4×6 timbers lie flat on a gravel pad as skids, the floor frame and deck sit on them, and four ground anchors strap the skids down. Four 6×6 posts stand at the corners at their full 8 ft length, a ring of doubled 2×8 beams sits on a step cut in each post top, and 8 knee braces stiffen the frame. Four 2×8 hip rafters meet on a short peak block, with 16 jack rafters between them.
Every part in the lists is drawn on its step page, and the shopping list, the cut list and the drawings were checked against each other part for part. The 10×10 hip roof gazebo plan sells for $19.99 as an instant PDF download that works on a phone, a tablet or a printed copy.
10×10 hip roof gazebo specs
Every number below comes from the plan’s own specs page. Lumber sizes are nominal: a 2×6 is really 1 1/2 in by 5 1/2 in, and a 6×6 post is 5 1/2 in square.
| Spec | Value |
|---|---|
| Floor | 10′ 0″ x 10′ 0″ (100 sq ft), deck top 10″ above the pad |
| Roof | 12′ 3″ x 12′ 3″ including the overhangs and fascia, 6 in 12 pitch, four equal sides |
| Clear height | 6′ 10 1/4″ from the deck to the underside of the beams |
| Overall height | about 11′ 3 5/16″ from the lawn to the top of the shingles at the peak, plus the hip caps |
| Base | gravel pad 12′ 0″ square, three treated 4×6 timbers as skids, 4 ground anchors |
| Floor frame | 9 treated 2×6 joists about 1′ 3″ on center, 21 rows of 5/4×6 deck boards |
| Posts | four treated 6×6 posts, 8 ft, used full length, bolted to the floor frame |
| Beam ring | two 2×8 boards on each side, in a step on the post tops |
| Knee braces | 8 treated 2×6 braces at 45 degrees |
| Rafters | four 2×8 hip rafters on a peak block, 16 2×6 jack rafters at 2′ 0″ on center, a hurricane tie on every jack |
| Roofing | 3/4 in exterior plywood, synthetic underlayment, drip edge, laminated shingles, hip caps |
| Railings | 3′ 0″ high, 2×4 boards for the rails, 2×2 balusters with gaps under 4 in, a 2×6 cap |
| Entry | 4′ 3 1/2″ wide between the entry posts, with a box step |
| Not included | a concrete slab base, screens, electrics and lights |
| The PDF | 41 pages, 13 step-by-step sections |
The base: gravel pad, skids and a deck floor
The gazebo stands on a gravel pad 12′ 0″ square, 4 in of compacted crushed stone set flush with the lawn (2.25 cu yd with extra for compaction). Three treated 4×6 timbers rated for ground contact lie flat on the gravel as skids. There are no post holes to dig and no concrete to mix or wait for.
The floor frame is 9 treated 2×6 joists between two full-length rim joists, held to the skids with 23 steel framing angles. On top go 21 rows of 5/4×6 deck boards with an even gap, notched around the posts. The plan draws every notch with its size, so the deck fits tight around each post.
Since the gazebo is not set in the ground, 4 auger-type ground anchors hold it down. Each one turns 30 in into the soil next to a skid end and a galvanized strap runs up the skid face to two screws. They are what keep the gazebo in place in a storm: do not leave them out.
Posts and the beam ring
Four treated 6×6 posts stand at the corners, on the outer skids inside the floor frame. They are used at their full 8 ft length and never cut to length, so the factory ends stay sealed. Each post is bolted to the floor frame with three 1/2 in carriage bolts, then held plumb on two faces with temporary braces until the beams are on.
The top of each post gets a step cut on its two outside faces, one board deep. The beam ring sits in those steps: two 2×8 boards on each side, meeting at the corners over the posts. One bolt passes through both boards at each corner, and structural screws tie the outer board ends. The posts carry the beams on wood, not on the bolts.
Each post weighs about 92 lb and an outer beam board about 42 lb, so two people stand and fit them. The deck goes down before the beams, so you work from a flat floor.
Knee braces
An open gazebo has no walls to stop it racking, so 8 knee braces do that job: two at each post, one under each beam that meets it. Each brace is a treated 2×6 at 45 degrees, 3′ 6 7/16″ long to the long points, held with structural screws at both ends. The plan draws each cut with its long point and the screw positions, so the screws clear the bolts in the beam ring.
The braces stay at the corners, well above the railings, so they do not crowd the seats inside. Together with the bolted post feet and the lapped beam ring, they keep the frame square both ways.
The hip roof frame: peak block, hips and jacks
A gazebo hip roof has no ridge board and no common rafters. Four 2×8 hip rafters run from the corners of the beam ring up to a short 4×4 peak block, each 8′ 8 13/16″ long with a plumb cut at both ends and a level seat near the foot. The peak block stands on a temporary 2×4 prop on the deck, braced plumb both ways, so nobody holds a rafter in the air: each hip is set on its seat, laid against the block and screwed, one at a time.
Then 16 2×6 jack rafters fill the four sides at 2′ 0″ on center, each cut with a side cut where it meets a hip. The plan gives the mark for every jack measured from the ring corner, and the length of each one, so all four sides come out the same. A hurricane tie holds every jack to the beam, and the fascia boards wrap the rafter tails all around with 1′ 0″ of overhang.
The roof is a 6 in 12 pitch, four equal triangles meeting at the peak. A hip rafter weighs about 37 lb.
Roof deck and shingles
The roof is 12′ 3″ square with the overhangs and fascia, so it shades more than the floor. It is decked with 8 sheets of 3/4 in exterior plywood (4 by 8 ft), cut to triangles and trapezoids from a cutting plan in the PDF so the least plywood goes to waste. The underside of the deck is what you see when you sit inside, so it looks finished.
On top go 6 pieces of galvanized drip edge, synthetic underlayment, a starter strip, 6 bundles of laminated shingles and 2 bundles of hip cap shingles. The plan shows the order: drip edge on the eaves, underlayment over it, then the shingles from the eave up on each side, cut along the hips and covered with the hip caps. Roof brackets and a plank give you a safe place to stand while you shingle.
Railings and the entry
Railings close the back and both sides, and both sides of a 4′ 3 1/2″ entry in the middle of the front. Each railing is 3′ 0″ high: a top and a bottom rail made of 2×4 boards on edge, 2×2 balusters spaced so no gap is 4 in or more, and a flat 2×6 cap. The bottom rail sits on small blocks above the deck so water and leaves sweep out under it.
Two short 4×4 entry posts frame the opening, bolted to the rim joist. A box step of treated lumber sits on the gravel in front of the entry, so the step up to the deck is easy.
Crew, weights and working safely
Two people build this gazebo, and every part goes up by hand. The heaviest part is a post, about 92 lb, then an outer beam board (about 42 lb) and a hip rafter (about 37 lb). Once the deck is down you work from a flat floor, and the prop under the peak block holds the roof framing while you fasten it.
Use ladders rated for at least 250 lb, with their feet on the deck or on a square of plywood on the lawn. Never stand above the third step from the top, never climb carrying a board, never leave a standing post unbraced, and stay off the roof deck in wet or windy weather. For the shingles, the plan uses roof brackets with a plank and a roof anchor with a lifeline.
The PDF has a time table for two people: about 60 hours in all, or four or five weekends for a first-timer. There is no concrete, so there is no cure time to wait for.
What a backyard gazebo is good for
A gazebo is a garden room without walls: shade and shelter you can sit in, with the breeze coming through. Common uses, kept general because every yard is different:
- A shaded seat in the garden. A bench or two chairs and a small table, out of the sun and out of a light rain.
- A focal point for the yard. A hip roof gazebo at the end of a path or beside a flower bed gives the garden a place to walk to.
- Beside a pool or a pond. A cool place to sit between swims, on its own deck floor.
- A quiet reading or coffee spot. Add cushions and a lantern, and it becomes the place you go in the morning.
Keep grills and open flames out of the gazebo: the roof is low and the deck is wood. The roof keeps off rain falling straight down; driving rain still blows in at the open sides.
Materials list for the 10×10 hip roof gazebo
The plan’s shopping list has 50 items, grouped by building stage so each stage has its parts, and every board is listed in the stock length that wastes the least. Every piece of lumber that stays in the gazebo is pressure-treated. In short, this is what you buy:
- Posts: 4 treated 6×6 posts, plus short 4×4 entry and rail posts
- Treated framing and deck lumber: 81 boards for the skids, floor frame, beams, braces, rafters, fascia and railings, and the deck boards
- Base: 2.25 cu yd of crushed stone and 4 ground anchors with straps
- Roofing: 8 sheets of plywood (4 by 8 ft), 6 bundles of laminated shingles, hip caps, 6 pieces of drip edge, underlayment and starter strip
- Bolts and connectors: 24 galvanized carriage bolts with washers and nuts, 16 hurricane ties, framing angles, structural screws, deck screws and nails
- Temporary and finish: 2x4s for the post braces and the peak prop, a roof bracket plank, and 3 gallons of exterior stain
The full list of all 50 items, with the cut list, is in the plan PDF.
The plan does not list prices because lumber costs change every week. Take the list to the pro desk of your lumber yard or home center for a quote.
Tools
These are common framing and roofing tools. The one rental worth having is a plate compactor for the gravel pad. The PDF lists every tool and the fastener for every joint.
- Circular saw, and a miter saw if you have one for the jack and brace cuts
- Speed square, framing square, chisel and a handsaw for the post top steps
- Drill/driver with a long 9/16 in bit for the bolt holes, and an impact driver for the structural screws
- Socket set with a 3/4 in socket and a framing hammer
- 4 ft level, post level, string line, tape measure and chalk line
- Flat shovel, rake and a plate compactor (rental) or hand tamper for the gravel pad
- Two 8 ft stepladders, a 16 ft or longer extension ladder with a standoff, sawhorses and four clamps
- Utility knife with hook blades, tin snips and a roofing hammer
- Roof brackets, a roof anchor and a lifeline with a harness for the shingling
- Safety glasses, ear protection, gloves and a dust mask
Use hot-dip galvanized bolts and connectors, and screws rated for treated lumber: plain steel corrodes in it. Never burn treated scraps; the smoke and ash are toxic.
How to build the 10×10 hip roof gazebo, step by step
The PDF splits the build into 13 step-by-step sections, each with numbered steps, measured drawings and a 3D view with the new parts in orange. This is the order the plan follows, with the typical time for two people from the plan’s time table:
Step 1: Pad and skids (about 6 hours)
Mark the pad 12′ 0″ square, dig out the sod, spread and compact the gravel, then set the three skids level on it.
Step 2: Floor frame (about 4 hours)
Build the rim and floor joists on the skids, square them with the diagonals and fix them with framing angles.
Step 3: Posts (about 5 hours)
Cut the step in each post top, stand the posts at the corners, bolt them to the floor frame and brace them plumb.
Step 4: Deck (about 4 hours)
Screw down the deck boards with an even gap, notched around the posts.
Step 5: Beam ring (about 3 hours)
Set the beam boards in the post steps one at a time, lap the corners, bolt and screw them.
Step 6: Knee braces (about 2 hours)
Cut the eight braces at 45 degrees and screw them between the posts and the beams.
Step 7: Peak and hip rafters (about 4 hours)
Stand the peak block on its prop, then set and screw the four hip rafters one at a time.
Step 8: Jack rafters and fascia (about 5 hours)
Mark the jacks from the ring corner, set each one with its hurricane tie, then wrap the tails with the fascia.
Step 9: Roof deck (about 5 hours)
Cut the plywood from the cutting plan, raise each piece in a rope sling and nail it on.
Step 10: Roofing (about 8 hours)
Drip edge, underlayment, the starter strip, the shingles and the hip caps.
Step 11: Railings (about 8 hours)
Build each railing section with its blocks, rails, balusters and cap.
Step 12: Step and finish (about 6 hours)
Build the box step, check every anchor strap, and stain once the treated wood is dry enough to take it.
The skill level is beginner to intermediate with a helper: measuring, square and angled cuts, drilling straight bolt holes and checking level and plumb. The glossary at the back explains every carpentry word the plan uses.
Where to put a gazebo
- Room for the pad and the roof. The pad is 12′ 0″ square and the roof 12′ 3″ square. Leave at least 3 ft of working room around the pad for ladders, with no tree limbs or wires overhead.
- Away from the house eaves. Snow and ice sliding off a house roof can break the gazebo roof, so keep it out from under them.
- Distance and permits. A roofed structure this size can need a permit, and towns set how far it must stand from the property lines and the house. Check your local permit office before you buy anything.
- Buried lines. Call 811 a few days before you start, so gas, power and water lines get marked. The ground anchors go 30 in deep.
- Level, well-drained ground. Pick ground close to level that drains after rain. On a slope, dig the high side down rather than piling stone on the low side.
- Which way it faces. The entry is in the middle of the front. Face it toward the house or the path you will walk.
What is in the free 10×10 hip roof gazebo plan preview?
Download the free 10×10 hip roof gazebo plan preview before you buy. It shows the gazebo from the front and the back, the build stages in order and real pages from the plan, so you can see how the drawings look and whether the size fits your yard.
| Item | Free preview | Full plan |
|---|---|---|
| Overview, views and build stages | Yes | Yes |
| Shopping list with quantities | No | Yes |
| Cut list for every part | No | Yes |
| Measurements in every step | Overall sizes | Every part |
| Step-by-step drawings | Preview pages | 41 pages, 13 sections |
| Joint close-ups, roof cutting plan and time table | No | Yes |
| Price | Free | $19.99 |
Not right for you? Email [email protected] within 30 days of your purchase for a full refund.
Before you build
Rules for roofed backyard structures (permits, height, distance to property lines, anchoring) vary by town and HOA, and so do the snow and wind a roof must carry. The frame was laid out for about 30 lb per sq ft of snow on the roof and 115 mph wind with the four ground anchors in. Those are design targets, not a certified rating. Check your local permit office before you buy lumber, and ask what your own site needs if your snow or wind is heavier.
The sides stay open. Do not add walls or solid panels to this frame: closed sides catch the wind in a way it is not laid out for. The plan covers a deck floor on skids and a shingle roof, not a concrete slab base or metal roofing.
Every year, check the shingles and the hip caps, tighten any bolts the drying wood has loosened, and check that every anchor strap is tight. More plans are on the all plans page.
Frequently asked questions
How big is the 10×10 gazebo?
The floor is 10' 0" by 10' 0" and the roof 12' 3" square with the overhangs. There is 6' 10 1/4" of clear height under the beams and about 11' 3 5/16" to the top of the peak shingles.
Do I need concrete footings?
No. The gazebo sits on three treated skids on a gravel pad, and 4 ground anchors strap it down. Ask your local permit office whether your town wants a different base.
How many people do I need to build it?
Two. The heaviest part is a post, about 92 lb. A prop holds the peak block while you fit the hip rafters. The plan's time table adds up to about 60 hours.
Is the railing safe for kids?
The railing is 3' 0" high with balusters spaced so no gap is 4 in or more. Check your local permit office for the railing rules where you live.
Do I need a permit for a 10×10 gazebo?
Rules for roofed backyard structures vary by town and HOA. Check your local permit office before you build, and call 811 before you turn in the ground anchors.
More about the 10×10 hip roof gazebo shed plan
Inside the 10×10 hip roof gazebo plan PDF
The 41-page PDF follows the build from start to finish, with 13 step-by-step sections. These are its parts in print order:
- How to use this plan: how to read the drawings, nominal and actual lumber sizes, the weight of the heaviest parts, ladder safety and a time table for two people.
- Overview and dimensions: views from the front and the back, the front and side elevations and every part named.
- Permits and siting: what to ask before you start (check your local permit office), calling 811, room for the pad and the roof, level ground and which way the entry faces.
- Specs: floor, roof, clear and overall height, base, floor frame, posts, beam ring, knee braces, rafters, roof deck, railings and entry, and what the frame was laid out for.
- Shopping list by section: every item with its quantity and what it is used for, grouped by building stage.
- Cut list: every part with its lumber, exact length, the boards to buy and how many parts each board gives.
- Tools and fasteners: the tool list and a fastener schedule for every joint.
- Key joints up close: close-up pictures of every joint, from the post foot to the peak block.
- Pad and floor frame: the gravel pad, the three skids, the joists, the framing angles and the ground anchors.
- Posts: the two-face step at each post top, the posts stood and bolted to the floor frame, braced plumb.
- Deck: the deck boards with their gaps and the notches around the posts.
- Beam ring: the two-board beams on the post steps, bolts and structural screws at every corner.
- Knee braces: the eight 45 degree braces between the posts and the beam ring.
- Peak and hip rafters: the peak block on a temporary prop, the four hip rafters and their screws.
- Jack rafters and fascia: every jack marked from the ring corner, hurricane ties, and the fascia around the eaves.
- Roof deck: the plywood pieces from the cutting plan, raised in a rope sling, nailed on.
- Roofing: drip edge, underlayment, starter strip, laminated shingles and the hip caps, with the roof brackets.
- Railings and step: the railing sections, balusters, caps and the box step at the entry.
- Finish and care: stain once the treated wood has dried, the anchor strap check, and what to check every year.
- Appendix: glossary: every carpentry word in the plan, in plain English.
Ready to build the 10×10 hip roof gazebo shed?
$19.99 for the full PDF: every step, cut and board. 30-day money-back guarantee.